mNo edit summary Tag: Visual edit |
|||
| (25 intermediate revisions by 8 users not shown) | |||
| Line 1: | Line 1: | ||
| − | Modding of the legacy Kee Engine version is possible, but discouraged, as this version is no longer in development. |
+ | '''''Modding''' of the legacy Kee Engine version is possible, but discouraged, as this version is no longer in development.'' |
| − | Modding of the UE4 |
+ | Modding of the UE4 version of Automation is supported, having started at the end of September 2017. |
| + | == Mod types == |
||
| ⚫ | |||
| ⚫ | |||
| ⚫ | |||
| ⚫ | |||
| ⚫ | |||
| + | **[[Decal Mods]] |
||
| + | * [[Rim Mods]] |
||
| ⚫ | |||
| + | == Required software == |
||
| ⚫ | |||
| + | * The UE4 Editor (from the Unreal Engine website) |
||
| − | IF your Steam Library is within Program files. It is recommended to copy AutomationGame project to another folder. |
||
| + | * A 3D modeling suite (e.g. 3ds Max, Blender, or Maya, but this wiki only covers the specifics of using 3ds Max and Blender) |
||
| + | * The Automation SDK (from Steam) |
||
| + | == Installing UE4 == |
||
| − | Once installed, you can open the AutomationGame project with UE4 Editor. |
||
| ⚫ | |||
| + | Make sure to download the correct version. We do not use the latest version of UE4. |
||
| ⚫ | |||
| − | * Mods in UE4 are called 'Plugins'. |
||
| ⚫ | |||
| ⚫ | |||
| − | * Cooking is probably going to be bugged for a few versions, don't worry. Keep making mod stuff and we will get it to work. |
||
| ⚫ | |||
| ⚫ | |||
| ⚫ | |||
| − | * Click on View Options (bottom right of the content browser), Turn on 'Show Plugin Content'. |
||
| − | [[File:Content Browser Example.png|thumb]] |
||
| + | [[File:Ue424.png|frameless|240x240px]] |
||
| ⚫ | |||
| − | * We have not implemented custom levels yet, but feel free to start making your own photo scenes, we will support them soon. |
||
| − | * We have not yet implemented a way for you to build custom materials to load onto cars/fixtures. As we have to replace materials at runtime, we will provide a mechanism for this at some point. |
||
| − | + | == Installing the SDK == |
|
| ⚫ | |||
| ⚫ | |||
| + | |||
| ⚫ | |||
| + | It is recommended to '''''copy the''''' <code>AutomationGame</code> '''''project to another folder''''' before using it. This eliminates the risk of mod files being overwritten or erased in the event of an SDK update. |
||
| ⚫ | |||
| + | |||
| ⚫ | |||
| + | Browse to the location of the modding SDK in your Steam Tools library (by default, this is <code>C:\Program Files (x86)\Steam\steamapps\common\Automation_SDK</code>), and copy the project folder to a new location (''with no spaces in the file path''). |
||
| + | |||
| + | Once installed, you can open the <code>AutomationGame</code> project by launching the UE4 Editor from the Epic Games Launcher and browsing to the project file, which is located in <code>Automation_SDK\AutomationGame\AutomationGame.uproject</code>.<gallery mode="nolines" widths="240" heights="180"> |
||
| + | File:Project browser 01.png |
||
| + | File:Project-browser-02.gif |
||
| + | File:Project-browser-03.gif |
||
| + | File:Project-browser-04.gif |
||
| + | </gallery> |
||
| + | |||
| + | == Troubleshooting startup issues == |
||
| + | |||
| + | * The first launch of the SDK will be very slow (on slower computers, it can take between 30 minutes and 2 hours). This is due to the editor generating cache data (in <code>DerivedDataCache</code>). If you make a shortcut to <code>UE4Editor.exe</code>, you can change the target to <code>D:\UE4\UE4_424\Engine\Binaries\Win64\UE4Editor.exe D:\AutomationGame\AutomationGame.uproject -LOG</code>. With the paths updated to where your UE4Editor is installed, and where you have copied the Automation SDK to. This will open the editor with a Log Console Window along with the splash screen, which will give you an idea if it is actually processing items or has gotten stuck. |
||
| + | * If you get errors relating to the FMOD Studio plugin not loading, or other plugins not loading, this could be due to redistributables and dependencies not being installed correctly. [https://support.microsoft.com/en-nz/help/2977003/the-latest-supported-visual-c-downloads Visual C++ 2019] and [https://www.microsoft.com/en-nz/download/details.aspx?id=40784 Visual C++ 2013] redistributables, along with [https://www.microsoft.com/en-nz/download/details.aspx?id=8109 DirectX June 2010] runtimes, are required. |
||
| + | |||
| ⚫ | |||
| + | |||
| + | * Despite being referred to by UE4 as 'plugins', mods are stored in the 'Mods' folder. |
||
| ⚫ | |||
| ⚫ | |||
| + | |||
| + | === Performance considerations === |
||
| + | Performance of [[Fixture Mods|fixtures]] and [[Car Body Mods|bodies]] in UE4 is a heated topic. While it is true that in terms of mesh rendering and draw calls, there is practically zero performance impact for meshes with less than 2,000 polygons, the same cannot be said for shader rendering or fixture stamping. |
||
| + | |||
| + | * Shading is calculated with a 2x2 grid, so poly count only impacts performance here if you end up with polygons too close together in screen space. This is usually not an issue in Automation, but meshes that are too dense or small will impact performance. This is a negligible consideration compared to raycasts for fixtures, however (explained below). |
||
| + | * There is a performance impact to poly count with fixtures in that a ray is cast to the body for every vertex; the more vertices there are in a mesh, the longer it'll take to conform to the body. This is why you'll see more detailed fixtures sit there for a few seconds before conforming to the car. This is doubly so for fixtures that cut into the body—a UV mesh's vertices are raycast to the car on every frame while you're dragging the fixture around. UV meshes impact performance signinficantly with a higher poly count; try to keep UV meshes as low-poly as possible. |
||
| + | * Likewise, the poly count of a car body impacts performance in that the more polygons a car has, the longer it takes to complete fixture raycasts. A 10K-poly body may make dragging fixtures around and conforming them to the car take slightly longer than usual, but if that same body uses morph targets in addition to (or instead of) bones, this poly count is multiplied by the number of shape keys and the vertices they move. A 10K-poly body with 10 shape keys affecting every vertex effectively has 100K polygons that the fixture system has to raycast to, and this significantly impacts the time it takes for fixtures to conform. |
||
| + | |||
| + | ==== For optimal performance: ==== |
||
| + | |||
| + | *Keep UV meshes lower than 100 triangles. With between 100 and 150 triangles, the fixture may lag when being dragged around; any higher and it will lag too much to use properly. |
||
| + | *Try to keep conforming meshes lower than 5,000 triangles. Higher-resolution meshes take longer than usual to conform to the car once they are placed. |
||
| + | * try to keep bodies between 7k-30k polygons, and use bone weighting for as many morphs as possible. Use shape keys and morph targets sparingly. |
||
| + | **The fewer vertices a body has, the less information there is to interpolate the cutouts, so some fixtures may have misaligned holes. |
||
| + | **the greater vertices a body has, the longer it takes to stamp a fixture. |
||
| + | |||
| + | This is a body that uses only bone weighting for its morphs, and has 7K polygons: |
||
| + | |||
| + | {{#ev:gfycat|DiscreteLonelyBluetonguelizard}} |
||
| + | |||
| + | This is a body that uses only shape keys for its morphs, and has 40k polygons: |
||
| + | |||
| + | {{#ev:gfycat|InfinitePaleJellyfish}} |
||
| + | |||
| ⚫ | |||
| ⚫ | |||
| + | |||
| + | [[File:Project-browser-05.gif|frameless|600x600px]] |
||
| + | |||
| + | == Creating and cooking your mod == |
||
| + | To create a mod, refer to the following sections: |
||
| + | |||
| + | * [[Car Body Mods#Import Car Body to Unreal Engine|Import Car Body to Unreal Engine]] |
||
| + | * [[Fixture Mods#Fixture setup within Unreal Engine 4|Fixture Mods]] |
||
| + | |||
| + | When you've made your files and want to share your mod, select 'Share Mod' -> [Mod name to share]. |
||
| + | |||
| + | [[File:Project-browser-06.gif|frameless|840x840px]] |
||
| + | |||
| + | '''''WARNING:''''' The folder you select will have '''''all of its contents deleted.''''' You have been warned! |
||
| + | |||
| + | Select an empty or new folder, in a path where there are no spaces in the file path. |
||
| + | |||
| + | #<code>C:\Users\Name\Documents\Unreal Projects\AutomationGame</code> will ''not'' work, as there is a space between "Unreal" and "Projects". |
||
| + | #<code>C:\Users\Name\Documents\UnrealProjects\AutomationGame</code> ''will'' work, because there is no spaces in the file path. |
||
| + | |||
| + | To fix possible cooking issues: |
||
| + | * Search the Output Log for <code>Error:</code>. Relevant lines will be prefixed by <code>UATHelper</code>. |
||
| ⚫ | ** If Error contains "Unable to find PackagePlugins" or similar, this is due to the Editor being in Program Files. It will be unable to copy <code>Camso_UATScripts.Automation.dll</code> to <code>Engine/Binaries/DotNet/AutomationScripts</code>. You can do this yourself by going to <code>AutomationGame/Build/Camso_UATScripts/bin</code> and copying the DLL to <code>UE4/Engine/Binaries/DotNet/AutomationScripts</code>. |
||
| + | **If Error contains "an item with the same key already exists", then you have a mod or plugin somewhere with a duplicate <code>.uplugin</code> file. navigate to the plugin and mod files and delete any duplicate <code>.uplugin</code> files and try again. If any one mod has a duplicate, all mods will fail to cook. |
||
| + | |||
| + | You can visit the Automation [http://discourse.automationgame.com/ forum] or [https://discord.gg/automationgame Discord] for further help. |
||
| + | |||
| + | == Testing your mod == |
||
| + | After cooking, it's possible to test your mod in-game without having to upload it to the Steam Workshop. |
||
| + | |||
| + | The file path of your cooked mod should look something like this:<pre> |
||
| + | ExampleMod |
||
| + | └─ WindowsNoEditor |
||
| + | ├─ Manifest_NonUFSFiles_Win64.txt |
||
| + | └─ AutomationGame |
||
| + | └─ Mods |
||
| + | └─ ExampleMod <- Copy this folder over |
||
| + | ├─ metadata |
||
| + | ├─ ExampleMod.uplugin |
||
| + | └─ Content |
||
| + | └─ Paks |
||
| + | └─ WindowsNoEditor |
||
| + | └─ ExampleModpakchunk0-WindowsNoEditor.pak |
||
| + | </pre>Subscribed mods are stored in <code>[Steam install folder]\Steam\steamapps\common\Automation\UE424\AutomationGame\Mods</code>, which is where you can copy your cooked mod. To be specific, copy the <code>ExampleMod</code> subfolder directly inside of the cooked mod's <code>Mods</code> subfolder. |
||
| + | |||
| + | After copying your mod, be sure to start Automation with the launcher to make sure it recognizes the new mod. |
||
| + | |||
| + | == Uploading your mod to the Steam Workshop == |
||
| + | Once you have your cooked content, navigate to the modding SDK folder and open <code>Automation Workshop Publishing Tool.exe</code>. This tool will handle the initial upload of any mod you want to share with the community. Once you have uploaded your mod and created a Workshop page for it, you can edit some of its properties, such as uploading images, editing the description, or setting the visibility, from the Steam Workshop page of the mod. |
||
| + | |||
| + | This tool is also used for updating mods; to do so, select an existing mod from the list on the left and upload a new version with an optional change note. |
||
| + | |||
| + | [[File:SteamModSharing_01.gif|frameless|840x840px]] |
||
| + | |||
| + | # Your list of uploaded mods. Select 'New Item' to upload a new mod. |
||
| + | # The mod file path. Browse to the location of your mod by picking the path or typing the location in manually. The mod location is the root mod folder that you cooked the mod to; said folder should contain a <code>WindowsNoEditor</code> subfolder. |
||
| + | # The title and description field. These can be edited from the mod's Steam Workshop page. A long-enough description that belongs to an already-uploaded mod may be cut off when said mod is selected—this only applies to the Workshop uploader tool, and the description can be recovered from the Workshop item's description edit page (or saved in a text file beforehand). Copying the description from the Workshop page itself will likely result in the loss of any [https://steamcommunity.com/comment/Guide/formattinghelp text formatting] used. |
||
| + | # The main image file path. The image you select will show up as the thumbnail when browsing the Workshop, and if you don't have any images on the actual workshop page (uploaded via Steam), then this image will also be the header image at the top of the page. All thumbnail images must be under 1 MB. Be aware that '''''the main image of a mod cannot be changed via Steam.''''' |
||
| + | # The visibility setting. This can be edited later in the Workshop page for your mod. By setting it to private or hidden first, you can see if any text formatting and images on the Workshop page appear as they should before publishing it. |
||
| + | # The mod category tags. While optional, these help with discoverability, as players may be looking for specific types of mods. |
||
| + | # The optional change note field. This can be used to label versions in case you need to revert to an earlier version. Change notes can be edited via Steam. |
||
| + | |||
| + | Once the submission or update process is complete, a browser window will open to the newly created Steam Workshop page for your mod. |
||
| + | |||
| ⚫ | |||
| + | |||
| + | * We have not yet implemented a way for custom materials to be applied to cars or fixtures. As the game replaces materials at runtime, we will provide a mechanism for this at some point. For now, any custom material initially assigned to a mesh will be kept as long as the player does not change the material. As soon as a fixture's material slot is changed in the fixture menu, any custom material assigned to that slot is lost (but can be reverted using the material reset button). |
||
| + | |||
| + | == See also == |
||
| + | *[[Mods and the Beam.NG Exporter|Mods and the BeamNG Exporter]], for custom materials |
||
| − | === Cooking === |
||
| + | *[[Blender Specific instructions|Modding in Blender]] |
||
| − | Select Share -> Mod Name to share. |
||
| + | *[[Upgrading 4.21 Mods to 4.24]] |
||
| − | ==== WARNING THE FOLDER YOU SELECT WILL HAVE ALL OF ITS CONTENTS DELETED. YOU HAVE BEEN WARNED. ==== |
||
| + | [[Category:Articles]] |
||
| − | Fixing Possible Cooking Issues: |
||
| − | * Search Output Log for 'Error:' |
||
| − | * Lines will be prefixed by UATHelper |
||
| ⚫ | * If Error contains |
||
| − | * Google Other Errors, or ask on forums. |
||
Revision as of 07:48, 19 July 2021
Modding of the legacy Kee Engine version is possible, but discouraged, as this version is no longer in development.
Modding of the UE4 version of Automation is supported, having started at the end of September 2017.
Mod types
Required software
- The UE4 Editor (from the Unreal Engine website)
- A 3D modeling suite (e.g. 3ds Max, Blender, or Maya, but this wiki only covers the specifics of using 3ds Max and Blender)
- The Automation SDK (from Steam)
Installing UE4
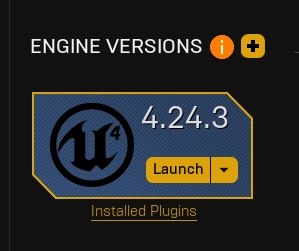
You will need to download and install the UE4 Editor (version 4.24) from here: https://www.unrealengine.com/download
Make sure to download the correct version. We do not use the latest version of UE4.
Do not install the UE4 Editor to Program Files. Instead, install it to a custom location without a space in it, like C:\UE4\UE_4xx or similar.
Installing the SDK
Within Steam, go to Library -> Tools, and download 'Automation - Car Company Tycoon Workshop Tool'—this contains the SDK for Automation.
It is recommended to copy the AutomationGame project to another folder before using it. This eliminates the risk of mod files being overwritten or erased in the event of an SDK update.
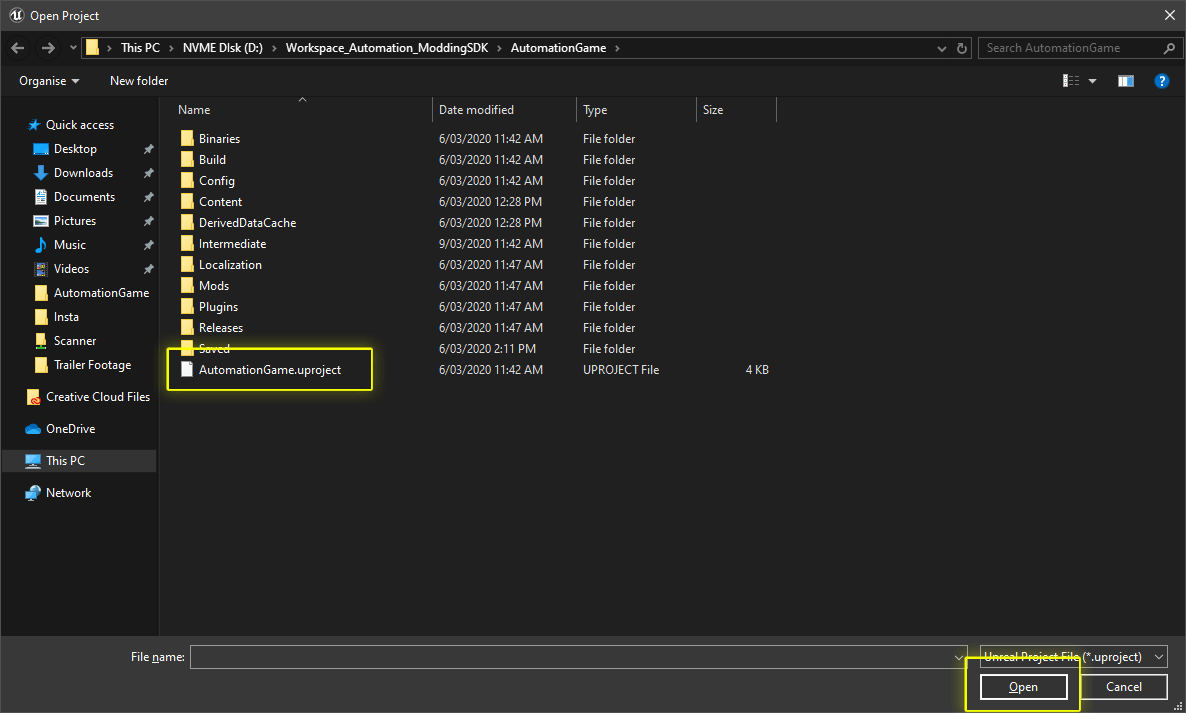
Browse to the location of the modding SDK in your Steam Tools library (by default, this is C:\Program Files (x86)\Steam\steamapps\common\Automation_SDK), and copy the project folder to a new location (with no spaces in the file path).
Once installed, you can open the AutomationGame project by launching the UE4 Editor from the Epic Games Launcher and browsing to the project file, which is located in Automation_SDK\AutomationGame\AutomationGame.uproject.


Troubleshooting startup issues
- The first launch of the SDK will be very slow (on slower computers, it can take between 30 minutes and 2 hours). This is due to the editor generating cache data (in
DerivedDataCache). If you make a shortcut toUE4Editor.exe, you can change the target toD:\UE4\UE4_424\Engine\Binaries\Win64\UE4Editor.exe D:\AutomationGame\AutomationGame.uproject -LOG. With the paths updated to where your UE4Editor is installed, and where you have copied the Automation SDK to. This will open the editor with a Log Console Window along with the splash screen, which will give you an idea if it is actually processing items or has gotten stuck. - If you get errors relating to the FMOD Studio plugin not loading, or other plugins not loading, this could be due to redistributables and dependencies not being installed correctly. Visual C++ 2019 and Visual C++ 2013 redistributables, along with DirectX June 2010 runtimes, are required.
Core concepts
- Despite being referred to by UE4 as 'plugins', mods are stored in the 'Mods' folder.
- Do not create any assets in the Root Content folder. Only make assets in your mod's folder. (See "Content Browser" below.)
- Editor assets cannot be used directly by the game; they have to be 'cooked'. Additionally, only plugins can be cooked, hence the requirement to make content in your mod folder.
Performance considerations
Performance of fixtures and bodies in UE4 is a heated topic. While it is true that in terms of mesh rendering and draw calls, there is practically zero performance impact for meshes with less than 2,000 polygons, the same cannot be said for shader rendering or fixture stamping.
- Shading is calculated with a 2x2 grid, so poly count only impacts performance here if you end up with polygons too close together in screen space. This is usually not an issue in Automation, but meshes that are too dense or small will impact performance. This is a negligible consideration compared to raycasts for fixtures, however (explained below).
- There is a performance impact to poly count with fixtures in that a ray is cast to the body for every vertex; the more vertices there are in a mesh, the longer it'll take to conform to the body. This is why you'll see more detailed fixtures sit there for a few seconds before conforming to the car. This is doubly so for fixtures that cut into the body—a UV mesh's vertices are raycast to the car on every frame while you're dragging the fixture around. UV meshes impact performance signinficantly with a higher poly count; try to keep UV meshes as low-poly as possible.
- Likewise, the poly count of a car body impacts performance in that the more polygons a car has, the longer it takes to complete fixture raycasts. A 10K-poly body may make dragging fixtures around and conforming them to the car take slightly longer than usual, but if that same body uses morph targets in addition to (or instead of) bones, this poly count is multiplied by the number of shape keys and the vertices they move. A 10K-poly body with 10 shape keys affecting every vertex effectively has 100K polygons that the fixture system has to raycast to, and this significantly impacts the time it takes for fixtures to conform.
For optimal performance:
- Keep UV meshes lower than 100 triangles. With between 100 and 150 triangles, the fixture may lag when being dragged around; any higher and it will lag too much to use properly.
- Try to keep conforming meshes lower than 5,000 triangles. Higher-resolution meshes take longer than usual to conform to the car once they are placed.
- try to keep bodies between 7k-30k polygons, and use bone weighting for as many morphs as possible. Use shape keys and morph targets sparingly.
- The fewer vertices a body has, the less information there is to interpolate the cutouts, so some fixtures may have misaligned holes.
- the greater vertices a body has, the longer it takes to stamp a fixture.
This is a body that uses only bone weighting for its morphs, and has 7K polygons:
This is a body that uses only shape keys for its morphs, and has 40k polygons:
Content browser
Click on the 'Show or hide sources' icon to the left of the Content Browser search box to view the folder structure. Click on 'View Options' (bottom right of the content browser), and turn on 'Show Plugin Content' to view all mods.

Creating and cooking your mod
To create a mod, refer to the following sections:
When you've made your files and want to share your mod, select 'Share Mod' -> [Mod name to share].

WARNING: The folder you select will have all of its contents deleted. You have been warned!
Select an empty or new folder, in a path where there are no spaces in the file path.
C:\Users\Name\Documents\Unreal Projects\AutomationGamewill not work, as there is a space between "Unreal" and "Projects".C:\Users\Name\Documents\UnrealProjects\AutomationGamewill work, because there is no spaces in the file path.
To fix possible cooking issues:
- Search the Output Log for
Error:. Relevant lines will be prefixed byUATHelper.- If Error contains "Unable to find PackagePlugins" or similar, this is due to the Editor being in Program Files. It will be unable to copy
Camso_UATScripts.Automation.dlltoEngine/Binaries/DotNet/AutomationScripts. You can do this yourself by going toAutomationGame/Build/Camso_UATScripts/binand copying the DLL toUE4/Engine/Binaries/DotNet/AutomationScripts. - If Error contains "an item with the same key already exists", then you have a mod or plugin somewhere with a duplicate
.upluginfile. navigate to the plugin and mod files and delete any duplicate.upluginfiles and try again. If any one mod has a duplicate, all mods will fail to cook.
- If Error contains "Unable to find PackagePlugins" or similar, this is due to the Editor being in Program Files. It will be unable to copy
You can visit the Automation forum or Discord for further help.
Testing your mod
After cooking, it's possible to test your mod in-game without having to upload it to the Steam Workshop.
The file path of your cooked mod should look something like this:
ExampleMod
└─ WindowsNoEditor
   ├─ Manifest_NonUFSFiles_Win64.txt
   └─ AutomationGame
      └─ Mods
         └─ ExampleMod   <- Copy this folder over
            ├─ metadata
            ├─ ExampleMod.uplugin
            └─ Content
               └─ Paks
                  └─ WindowsNoEditor
                     └─ ExampleModpakchunk0-WindowsNoEditor.pak
Subscribed mods are stored in [Steam install folder]\Steam\steamapps\common\Automation\UE424\AutomationGame\Mods, which is where you can copy your cooked mod. To be specific, copy the ExampleMod subfolder directly inside of the cooked mod's Mods subfolder.
After copying your mod, be sure to start Automation with the launcher to make sure it recognizes the new mod.
Uploading your mod to the Steam Workshop
Once you have your cooked content, navigate to the modding SDK folder and open Automation Workshop Publishing Tool.exe. This tool will handle the initial upload of any mod you want to share with the community. Once you have uploaded your mod and created a Workshop page for it, you can edit some of its properties, such as uploading images, editing the description, or setting the visibility, from the Steam Workshop page of the mod.
This tool is also used for updating mods; to do so, select an existing mod from the list on the left and upload a new version with an optional change note.

- Your list of uploaded mods. Select 'New Item' to upload a new mod.
- The mod file path. Browse to the location of your mod by picking the path or typing the location in manually. The mod location is the root mod folder that you cooked the mod to; said folder should contain a
WindowsNoEditorsubfolder. - The title and description field. These can be edited from the mod's Steam Workshop page. A long-enough description that belongs to an already-uploaded mod may be cut off when said mod is selected—this only applies to the Workshop uploader tool, and the description can be recovered from the Workshop item's description edit page (or saved in a text file beforehand). Copying the description from the Workshop page itself will likely result in the loss of any text formatting used.
- The main image file path. The image you select will show up as the thumbnail when browsing the Workshop, and if you don't have any images on the actual workshop page (uploaded via Steam), then this image will also be the header image at the top of the page. All thumbnail images must be under 1 MB. Be aware that the main image of a mod cannot be changed via Steam.
- The visibility setting. This can be edited later in the Workshop page for your mod. By setting it to private or hidden first, you can see if any text formatting and images on the Workshop page appear as they should before publishing it.
- The mod category tags. While optional, these help with discoverability, as players may be looking for specific types of mods.
- The optional change note field. This can be used to label versions in case you need to revert to an earlier version. Change notes can be edited via Steam.
Once the submission or update process is complete, a browser window will open to the newly created Steam Workshop page for your mod.
Known issues
- We have not yet implemented a way for custom materials to be applied to cars or fixtures. As the game replaces materials at runtime, we will provide a mechanism for this at some point. For now, any custom material initially assigned to a mesh will be kept as long as the player does not change the material. As soon as a fixture's material slot is changed in the fixture menu, any custom material assigned to that slot is lost (but can be reverted using the material reset button).
See also
- Mods and the BeamNG Exporter, for custom materials
- Modding in Blender
- Upgrading 4.21 Mods to 4.24