(fixed formatting + improved information) |
Dallenson34 (talk | contribs) Tag: Visual edit |
||
| (15 intermediate revisions by 9 users not shown) | |||
| Line 1: | Line 1: | ||
== Introduction == |
== Introduction == |
||
| − | The trim designer is where you are able to finalize your car by designing and configuring |
+ | The trim designer is where you are able to finalize your car by designing and configuring its exterior, interior, drivetrain and various other aspects. The trim designer is accessible only once you have [[Model / Family System|created a car model]], [[Chassis Design|designed the chassis]], and have [[Engine Design|selected or designed an engine]] for your car. Each trim represents a variation of your model upon which trim(s) are based off of, and trims within a model will share common features such as chassis type and suspension geometry. However, they can exist in different body styles, have different drivetrains and engines, and have various interior configurations/options. A diverse set of trims within a model allows it to fulfill multiple roles, such as a sedate family-oriented wagon or sporty luxurious sedan. |
== Body Style Selection == |
== Body Style Selection == |
||
| − | [[File:Body Selection page.png|center|frameless| |
+ | [[File:Body Selection page.png|center|frameless|1056x1056px|alt=]] |
| − | The first page that you will see once you set up your car model and engine is the trim body selection. When choosing a model, you are given a group of related body styles, and in the trim body selection, you choose which specfic body style you want for the trim you are building. The body style variety depends on which model you have selected. Some models, such as |
+ | The first page that you will see once you set up your car model and engine is the trim body selection. When choosing a model, you are given a group of related body styles, and in the trim body selection, you choose which specfic body style you want for the trim you are building. The body style variety depends on which model you have selected. Some models, such as supercars, may only have one available body, but standard passenger cars (such as the one pictured above) may be available in sedan, hatchback, wagon or coupe variants. Once you select a body, there are certain regions of the bodies that can be pushed in or pulled out in order to modify the look of the body. These regions are known as morphs, and allow for more unique designs. Morphs are not just for aesthetics; they are able to affect car stats such as drag, lift/downforce, weight, maximum tire widths and interior volume. |
| − | The body style type you choose for your trim will heavily affect what demographics your car will fit in, as |
+ | The body style type you choose for your trim will heavily affect what demographics your car will fit in, as it affects interior volume, door count, seating and many more variables. Body styles available in game include: |
* Coupe (2-door) |
* Coupe (2-door) |
||
| Line 19: | Line 19: | ||
== Paint == |
== Paint == |
||
| − | [[File:Paint selector.png|center|frameless| |
+ | [[File:Paint selector.png|center|frameless|1056x1056px|alt=]] |
| − | Now that you have selected your desired body style, you are now able to manipulate the paint of the car. This is done through the paint selector. The paint selector contains two |
+ | Now that you have selected your desired body style, you are now able to manipulate the paint of the car. This is done through the paint selector. The paint selector contains two columns: the scheme column (a work-in-progress feature), and the slots column. From the slots column, you are able to apply any paint color of your liking to up to 14 seperate paint slots, as well as paint all slots in a specific area at the same time. Each car body has a different amount of paint slots that affect different areas of the car; paint slots may not be 100% consistent between bodies. |
| + | |||
| + | These slots include the car body slots, such as the bumpers (front and rear), the hood (bonnet), the primary section of the body, the secondary section of the body (not all cars have a secondary slot), and for certain body styles, truck bed and convertible soft top slots. There are also trim slots, such as a standard trim slot (which can be any component of the car's body), window border trim, window pillars, and mirrors (older car bodies used to have mirrors integrated into the body itself, but now the mirror slot is used as an extra slot in most bodies). The wheel slots include the primary zone of the wheel, secondary zone, wheel rim, and brake caliper. |
||
=== Paint Applicator === |
=== Paint Applicator === |
||
| − | [[File:Painter.png|center|frameless| |
+ | [[File:Painter.png|center|frameless|1056x1056px|alt=]] |
| − | Once you select a certain slot for painting, you can now select the paint you want to apply to the selected slot. The types of paints you |
+ | Once you select a certain slot for painting, you can now select the paint you want to apply to the selected slot. The types of paints you can select include 'on car' paints, 'global' paints, and 'default' paints. |
| − | '''Default paints:''' Includes the game's default materials, such as soft top vinyl, plastic, carbon fiber, red metallic paint |
+ | '''Default paints:''' Includes the game's default materials, such as soft top vinyl, plastic, carbon fiber, the default red metallic paint, beige leather, aluminum, cloth, chrome and steel. |
'''On car:''' Paints that are custom-made by the user, and that are or were used in one of the car's slots. Accessible only from the specific trim applied to. |
'''On car:''' Paints that are custom-made by the user, and that are or were used in one of the car's slots. Accessible only from the specific trim applied to. |
||
| Line 35: | Line 37: | ||
==== Paint Designer (Simple) ==== |
==== Paint Designer (Simple) ==== |
||
| − | [[File:Paint design simple.png|center|frameless| |
+ | [[File:Paint design simple.png|center|frameless|1056x1056px|alt=]] |
In the paint maker, you can select various parameters to create a new paint. The first of which is the material parameter, which controls the base material of the paint. These are the same materials present in the default paint group. Once you select your desired base material, you can now choose the color. There are 147 different hues available for your paint. After you select your color, you can configure the shine of the paint (meant to simulate clearcoat), and flake (meant to simulate metallic paints). In the preview slot, you can see the final result of your paint design, and edit its name. Hitting the check button confirms your choice, and X cancels the choices. If you feel like the simplified paint maker is too limiting in paint choices, selected the paint bucket button on the bottom right will lead you to the advanced paint maker. |
In the paint maker, you can select various parameters to create a new paint. The first of which is the material parameter, which controls the base material of the paint. These are the same materials present in the default paint group. Once you select your desired base material, you can now choose the color. There are 147 different hues available for your paint. After you select your color, you can configure the shine of the paint (meant to simulate clearcoat), and flake (meant to simulate metallic paints). In the preview slot, you can see the final result of your paint design, and edit its name. Hitting the check button confirms your choice, and X cancels the choices. If you feel like the simplified paint maker is too limiting in paint choices, selected the paint bucket button on the bottom right will lead you to the advanced paint maker. |
||
==== Paint Designer (Advanced) ==== |
==== Paint Designer (Advanced) ==== |
||
| − | [[File:Paint design advanced.png|center|frameless| |
+ | [[File:Paint design advanced.png|center|frameless|1056x1056px|alt=]] |
| − | In the advanced paint maker, you are able to fine tune your paint's characteristics. You can modify your paint's hue (color), saturation (how rich |
+ | In the advanced paint maker, you are able to fine tune your paint's characteristics. You can modify your paint's hue (color), saturation (how rich in colour your paint is), and value (how bright your paint is). You are also able to fine tune your paint's shine and flakiness. In the simple paint designer, the shine settings of high, medium, and low are equivalent to 1.0, 0.5, and 0.1 shine respectively, while the flake settings of high, medium, and none are equivalent to 1.0, 0.5, and 0.0 flake respectively. The advanced paint designer also allows you to add pearlescent effects to your paint, which modifies how it shines and reflects. By default, the pearl color is white (meaning there are no pearlescent effects). |
== Fixtures == |
== Fixtures == |
||
| − | [[File:Fixtures.png|center|frameless| |
+ | [[File:Fixtures.png|center|frameless|1056x1056px|alt=]] |
| − | The central aspect of your car's aesthetic design revolves around the use of fixtures. Fixtures are various 3D models of items such as headlights, |
+ | The central aspect of your car's aesthetic design revolves around the use of fixtures. Fixtures are various 3D models of items such as headlights, grilles, license plates, and the like that you can place on (or in) your car in order to make it look like a proper car rather than a blank body shell. There are 1,918 fixtures in game, and many more available through the [https://steamcommunity.com/app/293760/workshop/ Steam Workshop] as mods. All mod fixtures (and bodies) have a banner on the corner of their thumbnail labelling them as mods. |
=== Fixture Categories === |
=== Fixture Categories === |
||
| − | Fixtures are organized by their types, as there are many different fixtures in game (as evidenced by the high fixture count). There are six categories of fixtures - lighting, cooling, aerodynamics, |
+ | Fixtures are organized by their types, as there are many different fixtures in game (as evidenced by the high fixture count). There are six categories of fixtures - lighting, cooling, aerodynamics, and three miscellaneous categories. |
| + | |||
| + | * In the lighting category, you can find headlights, taillights and indicators/side markers. |
||
| + | * In the cooling category, you can find fixtures such as grills, vents, scoops, and sunroofs/windows. |
||
| + | * In the aerodynamics category, you can find lips and diffusers, spoilers, and wings. |
||
| + | * In miscellaneous 1, you can find gas caps, door handles and mirrors. |
||
| + | * In miscellaneous 2, you can find antennas, license plates, bumper bars, and badging. |
||
| + | * In miscellaneous 3, you can find wheels, exhaust tips, miscellaneous fixtures, and a tow hitch. |
||
| + | |||
| + | Most fixtures are purely aesthetic, but aero fixtures will affect drag, lift and downforce characteristics, and the tow hook fixture is functional in BeamNG.drive. The exhaust tips also act as a source for exhaust fumes and afterfire in BeamNG.drive, but those are simply aesthetic effects. |
||
=== Fixture Placement and Editing === |
=== Fixture Placement and Editing === |
||
[[File:Fixture editor.png|frameless|820x820px|center]] |
[[File:Fixture editor.png|frameless|820x820px|center]] |
||
| + | Fixtures can be modified in many ways. To begin, many fixtures in game exist as a group of various fixtures, such as this rectangular sealed beam headlight, which exists in 10 different variations. There are various ways to edit the fixtures themselves, change how they interact with the car body, and change how they interact with each other. |
||
| − | Fixtures can be modified in many ways. To begin, many fixtures in game exist as a group of various fixtures, such as this rectangular sealed beam headlight, which exists in 10 different variations. There are various ways to edit the fixtures themselves, change how they interact with the car body, and change how they interact with each other. To go over the fixture editor, we will start with the upper left corner, at the 1/4 button. This is the fixture layering area, which allows fixtures to sit directly on top of other fixtures, hiding the lower layered fixture below. Two fixtures sitting in the same area on the same layer will have flickering known as [[wikipedia:Z-fighting|Z-fighting]], this is mitigated by having on fixtured layered on top of the other. Fixture layering may be useful for blending multiple fixtures into one design element, or hiding away an undesirable part of another fixture.Next to the layering options, there are tow bottons for resetting the fixture's scaling and rotation back to their default values. Next to that, there is a the rotation selection. You can choose to type in your own rotation angle (in degrees ranging from -360 to 360) to be able to fine tune your fixture placement. The two buttons next to the rotation angle are buttons made to rotate the selected fixture by 90 degrees, counter-clockwise or clockwise. The next two buttons flip your fixture, in the vertical or horizontal axis respectively. The button next to the flipping buttons toggles fixture mirroring on or off.[[File:Fixture behavior2.png|left|thumb|359x359px|Three identical fixtures, interacted with the body in three different manners. Left to right: cardinal lock, align to body, align to horizon]] |
||
| + | To go over the fixture editor, we will start with the upper left corner, at the 1/4 button. This is the fixture layering area, which allows fixtures to sit directly on top of other fixtures, hiding the lower layered fixture below. Two fixtures sitting in the same area on the same layer may result in flickering known as [[wikipedia:Z-fighting|Z-fighting]], mitigated by having one fixtured layered on top of the other. Fixture layering may be useful for blending multiple fixtures into one design element, or hiding away an undesirable part of another fixture. |
||
| ⚫ | The next three buttons modify how the fixture interacts with the car body. These buttons are (from left to right), 'align to body', 'cardinal |
||
| + | Next to the layering options, there are two buttons for resetting the fixture's scaling and rotation back to their default values. |
||
| − | ㅤ |
||
| + | Next to that is the rotation setting. You can choose to type in your own rotation angle (between -360 and 360 degrees) to fine-tune your fixture placement. The two buttons next to the rotation angle are buttons made to rotate the selected fixture by 90 degrees, counter-clockwise or clockwise. The next two buttons flip your fixture along the vertical or horizontal axis respectively. The button next to the flipping buttons toggles fixture mirroring on or off.[[File:Fixture behavior2.png|thumb|359x359px|Three identical fixtures, interacted with the body in three different manners. Left to right: cardinal lock, align to body, align to horizon|alt=]] |
||
| − | ㅤ |
||
| + | |||
| ⚫ | The next three buttons modify how the fixture interacts with the car body. These buttons are (from left to right), 'align to body', 'cardinal lock', and 'align to horizon'. The align to body function causes the fixture to align itself based on the car's geometry, allowing the fixture to follow the shape and contouring of the body. The second function, cardinal lock, forces the fixture to face one of six cardinal directions: up, down, left, right, forwards, and backwards. The third function, align to horizon, works similarly to cardinal lock, except the up and down directions are disabled, meaning the fixture can only face forward, backwards, left or right. Due to a bug, the 'align to horizon' setting can only be enabled if the fixture was set to 'align to body' first. |
||
ㅤ |
ㅤ |
||
| Line 65: | Line 78: | ||
ㅤ |
ㅤ |
||
| ⚫ | |||
| − | [[File:Material master.png|left|frameless|635x635px]] |
||
| ⚫ | The final aspect of fixture manipulation is the material editing area. Most fixtures |
||
| + | After the direction modifying functions, the rest are utility functions. The first, represent by a trash can icon, is for deleting the selected fixture. The next two are undo and redo buttons. The padlock represents a locking feature, which locks the selected fixture so that it cannot be moved, rotated or scaled. The final checkmark button unselects the fixture. |
||
| ⚫ | There isn't much that can be said about creating a good |
||
| + | |||
| ⚫ | On the top right of the fixture selection area is a circle and a magnet button. The circle button toggles fixture highlights, which means that selected fixtures have a thin green outline, and fixtures being hovered over have a yellow outline. By default, this feature is on. The magnet button represents center snapping, which causes fixtures to automatically snap to the center of the car body when enabled (by default, it is on).[[File:Material master.png|left|frameless|635x635px]] |
||
| ⚫ | The final aspect of fixture manipulation is the material editing area. Most fixtures, with the exception of badges, have areas that can have their materials edited, and different areas can accept different types of materials. There are five groups of materials (shown on the left), and each material editing slot can access only one of the five material groups (the creator of the fixture decides which material group each material slot uses). For example, plate slots can only accept plate materials, and glass slots can only accept glass materials. Material selection is quite an important feature, as it allows any fixture to be used for anything. |
||
| + | |||
| + | One of the most important hints regarding car design within the game is to learn how to use fixtures for purposes they were not made for, which can be achieved through creative use of materials. |
||
| + | |||
| ⚫ | There isn't much that can be said about creating a good-looking design, as looks are subjective and unable to be measured objectively. The best design advice is to look at real cars from the same time period as your creation, and use similar fixtures and design cues (for example, using circular sealed beam headlights and lots of chrome accents on a 1960's American car build). The second best advice for creating good visual designs is to visit the [http://discourse.automationgame.com/ forum] and the [https://discord.gg/automationgame Automation Discord], where other players will be able to guide and critique your design(s). |
||
== Drivetrain == |
== Drivetrain == |
||
| − | [[File:Drivetrain selector.png|center|frameless| |
+ | [[File:Drivetrain selector.png|center|frameless|1056x1056px|alt=]] |
| − | Now with the aesthetics out of the way, it is time to focus on the guts of your car, beginning with power delivery. For the power to get from your engine to the wheels, it needs to be transferred through a mechanical system |
+ | Now with the aesthetics out of the way, it is time to focus on the guts of your car, beginning with power delivery. For the power to get from your engine to the wheels, it needs to be transferred through a mechanical system known as the drivetrain (or, less commonly, driveline). |
=== Drive Type === |
=== Drive Type === |
||
Various drive types are available depending on how your model was originally set up, specifically the engine layout and suspension design. Using different drive wheels (such as the front wheels, rear wheels, or all four wheels - part time or full time) can heavily modify your car's driving dynamics. Remember that all drive types have the potential to be sporty depending on the engine powering your car, and your tuning, and vice-versa - all drive types can be made into mundane average cars. Available drive types depend on the car's engine layout and available space within the engine bay. |
Various drive types are available depending on how your model was originally set up, specifically the engine layout and suspension design. Using different drive wheels (such as the front wheels, rear wheels, or all four wheels - part time or full time) can heavily modify your car's driving dynamics. Remember that all drive types have the potential to be sporty depending on the engine powering your car, and your tuning, and vice-versa - all drive types can be made into mundane average cars. Available drive types depend on the car's engine layout and available space within the engine bay. |
||
| − | * Front-wheel drive [FWD] - Considered simple and easy to drive, usually installed on average, economical, safe, family and commuter vehicles. Available on cars with front-longitudinal and front-transverse layouts. |
+ | * Front-wheel drive [FWD] - Considered simple and easy to drive, and usually installed on average, economical, safe, family and commuter vehicles. Available on cars with front-longitudinal and front-transverse layouts. |
| − | * Rear-wheel drive [RWD] - Considered sporty, usually installed on premium and sporty cars. Not as economical as FWD, but more economical |
+ | * Rear-wheel drive [RWD] - Considered sporty, usually installed on premium and sporty cars. Not as economical as FWD, but more economical than 4x4 and AWD. Also installed on vehicles that carry lots of heavy loads in the rear, such as trucks, utility vans, and utes. Available on cars with front-longitudinal, mid-longitudinal, mid-transverse and rear-longitudinal layouts. |
| − | * All-wheel drive [AWD] - |
+ | * All-wheel drive [AWD] - Considered easy to drive or sporty. Installed on all types of cars. Less economical than FWD and RWD, due to the weight of the AWD system and reduced efficiency in powering four wheels instead of two. AWD's main advantage is its ability to avoid wheel spin by spreading power to four wheels intead of two. Available on cars with any engine layout except for the mid-transverse layout. |
| − | * Four |
+ | * Four-by-four [4x4] - Is made exclusively for utility and offroad vehicles. Least economical of all drivetrains, due to heavy weight. 4x4's main advantage is the ability to be turned on or off, and its ability to traverse rough terrain. When turned off, 4x4 acts like RWD, powering only the rear wheels. Only available on cars with front-longitudinal engine layouts. |
=== Gearbox === |
=== Gearbox === |
||
The gearbox is responsible for delivering power from the engine to the drive system and wheels. A gearbox is a set of gears whose job is to synchronize the rotation of the wheels to the rotation of the engine. Through torque multiplication and multiple gear ratios, the transmission is able to keep the wheels spinning at higher and higher speeds while preventing the engine from spinning too fast, by employing a longer gear that keeps wheel speed high and engine speed low. Automation currently has five gearbox types. |
The gearbox is responsible for delivering power from the engine to the drive system and wheels. A gearbox is a set of gears whose job is to synchronize the rotation of the wheels to the rotation of the engine. Through torque multiplication and multiple gear ratios, the transmission is able to keep the wheels spinning at higher and higher speeds while preventing the engine from spinning too fast, by employing a longer gear that keeps wheel speed high and engine speed low. Automation currently has five gearbox types. |
||
| − | *'''Automatic''' - |
+ | *'''Automatic''' - a classic mechanically operated automatic transmission. Colloquially known as a "slushbox", these transmission types are the worst for performance and efficiency, but greatly surpass most transmissions in drivability. These automatic transmissions came before the use of onboard computers, and were retired with the advent of ECUs in cars. |
| − | *'''Advanced Automatic''' - modern automatic transmission system, operated by the onboard computer. These transmissions are more efficient, shift quicker, and are even more drivable than classical automatic transmissions. These transmissions can also be switched to a manual shifting mode. |
+ | *'''Advanced Automatic''' - a modern automatic transmission system, operated by the onboard computer. These transmissions are more efficient, shift quicker, and are even more drivable than classical automatic transmissions. These transmissions can also be switched to a manual shifting mode. |
| − | *'''Manual''' - the standard transmission, operated via gear select lever and clutch pedal. These |
+ | *'''Manual''' - the standard transmission, operated via a gear select lever and clutch pedal. These transmissions exceed all others in cheapness, efficiency and sportiness thanks to their solid clutch as opposed to the fluid torque converters of an automatic transmission. However, these transmissions are the hardest to drive, as they require good handling of the clutch. |
| − | *'''Sequential''' - a spin-off of the manual transmission, with an automated clutch |
+ | *'''Sequential''' - a spin-off of the manual transmission, with an automated clutch and inability to skip gears. The drive can only shift up to the next gear or down to the previous gear. Boasted superior performance to a manual thanks to quicker shifting times, and was used in sports cars and supercars of the 2000s. Superseded by dual-clutches in road cars due to its harshness, but common in race cars. (Note that in BeamNG.drive, the clutch in a sequential transmission is manual like those introduced in the 0.11 update for that game and thus must be launched manually.) |
| − | *'''Dual |
+ | *'''Dual-Clutch''' - an evolution of the sequential transmission, with two automated clutches. This transmission type fully replaced the sequential in road cars, and is usually equipped in modern sports cars and supercars. |
==== Ratios ==== |
==== Ratios ==== |
||
| − | The gearbox can |
+ | The gearbox can have multiple gears (from 2 to 9). Fewer gears mean a lighter, simpler and cheaper gearbox. Having more gears means more ratios to work with, leading to potentially faster acceleration and better fuel economy. Only automatic transmissions may have more than 7 gears. |
==== Top Speed ==== |
==== Top Speed ==== |
||
| − | The top speed slider manages the ratios of each |
+ | The top speed slider manages the ratios of each gear in the transmission, as well as the final drive ratio. The game will calculate an estimated top speed for your car based on its drag coefficient, weight, and engine power. Based on this information, you can set up your gearing. Shorter gearing (with a lower top speed) allows for theoretically quicker acceleration (as long as your car can maintain grip), while longer gearing (with a higher top speed) allows for better fuel economy and reduced wheel spin. If your gearing goes beyond your top speed, your longest gears will have a ratio of less than one, making them overdrive gears. Overdrive gears are great for fuel economy, as they allow your car to cruise at highway speeds while the engine operates at a lower, more efficient RPM range, usually 1500 to 3500 RPM. |
| + | |||
| + | If your car's engine is equipped with a fuel injection system (as opposed to a carburetor), you can also electronically limit its top speed using the +/- buttons. A lower top speed reduces costs, as you don't need to use more expensive wheels and tires rated for higher speeds, and a higher top speed (to a certain attainable point) will increase your vehicle's sportiness and prestige. |
||
==== Spacing ==== |
==== Spacing ==== |
||
| − | The spacing slider controls the spacing between the ratios of the transmission's gears |
+ | The spacing slider controls the spacing between the ratios of the transmission's gears; it modifies the ratios of the all the gears except the final gear. Lowered spacing reduces wheel spin, and keeps the engine running at higher RPM when shifting up. This setup is most favorable in sports cars. Increased spacing does the opposite; it allows the engine to quickly shoot up to high RPM, and then drop to a much lower RPM when shifting up. This setup is favored on utility and offroad vehicles, to help them accelerate while traveling over bad terrain or while carrying heavy loads. A normal car will benefit most from an average gear spacing setup (the default value), as it is best for fuel economy. |
=== Differentials === |
=== Differentials === |
||
| − | The differential is a drivetrain |
+ | The differential is a drivetrain component that takes a power input from the transmission or driveshaft and outputs the power to the drive wheels, while accounting for differences in individual wheel speed in corners or on uneven terrain. The differential is responsible for splitting power as equally as possible between the driven wheels. A car can have one to three differentials, depending on drive type. A 2WD drivetrain (front or rear wheel drive) only needs one differential to split power between the left and right drive wheels, while an AWD drivetrain needs three differentials - one to split power between the front and rear axles, one to split power between the front wheels, and one to split power between the rear wheels. A 4x4 drivetrain uses two differentials - one for each pair of driven wheels - and a transfer case, which can be toggled between 2WD and 4WD, by either running all power to the rear wheels or transferring power to the front at the operator's discretion. The difference between differentials is how they carry this task out. |
| − | *'''Open''' - the open differential is the simplest and cheapest differential. However, its main flaw is that is sends power through the path of least resistance. This means all the power will go through a wheel that might have lost grip due to any reason |
+ | *'''Open''' - the open differential is the simplest and cheapest differential. However, its main flaw is that is sends power through the path of least resistance. This means all the power will go through a wheel that might have lost grip due to any reason (e.g. a drive wheel on the inside of a turn due to the reduced weight resting on it), and it will spin that wheel alone. These are called "one-wheel peels", and are the reason why open differentials are the least sporty. |
| − | *'''Locking ( |
+ | *'''Locking (Manual/Automatic)''' - the locking differential is a bit more complex that the open differential. It is able to lock itself, which means it forces both wheels to spin at the same speed, preventing one-wheel peels. This is good for offroad use, where softer dirt and mud can easily be overcome. However, these types of differentials are bad for on-road use, as when a car turns, the wheels have to spin at different speeds. If they don't, it will cause premature tire wear. This is why locking differentials can be engaged/disengaged, either manually via a lever or button, or automatically. Manually locking differentials are preferred over the automatic system, as they give more control to the driver and are less complex than their automatic counterpart. |
| − | * |
+ | *'''LSD (Limited Slip Differential)''' - the LSD is the most complex of the differentials. Three versions exist in the game, which accomplish the same task through different means. Their goal is to reduce wheel spin and afformentioned "one-wheel peels" by limiting slip (hence the name), all while maintaining on-road drivability. This is done by an internal mechanism which partially locks the wheels only when one starts slipping. This means that while both wheels don't spin at the same speed (as in a locking differential), they spin at closer speeds than what an open differential allows. This can be done via a viscous liquid coupling in a viscous LSD (similar to an automatic transmission's torque converter), mechanical spider gears in a geared LSD, or electronically engaged clutches in an electronic LSD. |
==== Power Distribution ==== |
==== Power Distribution ==== |
||
| Line 113: | Line 132: | ||
=== Drivetrain Graph === |
=== Drivetrain Graph === |
||
[[File:Drivetrain graph.png|left|frameless|592x592px]] |
[[File:Drivetrain graph.png|left|frameless|592x592px]] |
||
| − | After completing your car's design, you can go back to the drivetrain tab |
+ | After completing your car's design, you can go back to the drivetrain tab and review the drivetrain graphs. These graphs show you the gearing (in power to the wheels) at a certain speed, and traction (in acceleration force [g] at a certain speed, as well as the grip of the powered wheels). |
| + | |||
| + | The gearing graph's green lines are a representation of your engine's power output from idle to redline, showing how your car's engine and transmission would behave when accelerating from standstill to top speed. You can see at what speeds your car would shift up, and how much power you are making at a certain speed. Remember, the gearing graph shows wheel power as opposed to crank power in order to take in account power losses from the drivetrain. Some transmissions suffer fewer power losses than others; for example, a 2020 DCT transmission is much better at reducing power loss than a 1950 automatic. However, all transmissions have varying degrees of power loss. The power vs traction graph shows how good of a job your drivetrain and wheels are doing at accelerating the car. At low speeds, acceleration is usually limited by tire grip. |
||
ㅤ |
ㅤ |
||
== Wheels and Tires == |
== Wheels and Tires == |
||
| − | [[File:Wheelscorrect.png|center|frameless| |
+ | [[File:Wheelscorrect.png|center|frameless|1056x1056px|alt=]] |
| − | Your car's wheels are an important component. Without them, your car is just a |
+ | Your car's wheels are an important component. Without them, your car is just a fancy mechanical ornament with lights and a complex, noisy smoke machine. Good wheels can make or break a car design, so its important to know what you're doing here. Your wheels can be the determining factor as to what your car is capable of doing. |
=== Tire Type === |
=== Tire Type === |
||
| − | There are two types of tires that have been used in automotive history - cross ply (aka bias ply) and radial tires. The difference lies in their internal structure and contruction. Cross ply tires contain a tightly woven tubular interior that is stiff and resistant to too much flexing. Radial tires replace the woven interior tube with a steel belt wrapped with rubber. These different constructions lead to the tire types having different properties. |
+ | There are two types of tires that have been used in automotive history - cross ply (aka bias ply) and radial tires. The difference lies in their internal structure and contruction. Cross ply tires contain a tightly woven tubular interior that is stiff and resistant to too much flexing. Radial tires replace the woven interior tube with a steel belt wrapped with rubber. These different constructions lead to the tire types having different properties. Today, radial tires have fully replaced cross ply tires in the automotive industry, though cross ply tires remain in use for bicycles. |
*'''Cross ply''' advantages - Cheaper, better load bearing (compared to a radial tire of same width and compound type). |
*'''Cross ply''' advantages - Cheaper, better load bearing (compared to a radial tire of same width and compound type). |
||
| − | *'''Radial''' advantages - |
+ | *'''Radial''' advantages - allows for wider, lower-profile tires (which maximizes grip and performance), and allows for larger rims. Can offset any load-bearing disadvantages by simply being wider. |
=== Tire Choice === |
=== Tire Choice === |
||
| − | Tire choice covers various types of rubber compounds. Different rubber compounds are made through varying proportions of rubber, carbon, oils, and sulphur (induced by vulcanization). The tire compounds also have different tire tread patterns, to either maximize drivability or grip. Harder tire compounds have reduced rolling resistance and increased load |
+ | Tire choice covers various types of rubber compounds. Different rubber compounds are made through varying proportions of rubber, carbon, oils, and sulphur (induced by vulcanization). The tire compounds also have different tire tread patterns, to either maximize drivability or grip. Harder tire compounds have reduced rolling resistance and increased load-bearing ability, while softer compounds have reduced road noise and increased grip. |
| − | *'''Chunky Offroad''' - Uses a hard rubber compound, and a chunky tire tread to easily dig through dirt, mud and sand. |
+ | *'''Chunky Offroad''' - Uses a hard rubber compound, and a chunky tire tread to easily dig through dirt, mud and sand. Cheap to make, but produces the most road noise, leading to an uncomfortable ride. Least road grip out of all tire compounds. |
| − | *'''Hard Long Life''' - Uses a hard rubber compound, and a regular tire tread to maximize ease of driving (by displacing plenty of water in rainy conditions). Least rolling resistance of all tire types, allowing for maximized fuel economy and reduced wear |
+ | *'''Hard Long Life''' - Uses a hard rubber compound, and a regular tire tread to maximize ease of driving (by displacing plenty of water in rainy conditions). Least rolling resistance of all tire types, allowing for maximized fuel economy and reduced wear at the cost of grip. |
*'''Medium Compound''' - A softer rubber compound is used with a regular tire tread to maximize driving comfort and improve grip over hard long life tires. |
*'''Medium Compound''' - A softer rubber compound is used with a regular tire tread to maximize driving comfort and improve grip over hard long life tires. |
||
| − | *'''Sports Compound''' - A soft rubber compound used with a tread made to maximize grip, at the cost of shorter life span and reduced fuel economy |
+ | *'''Sports Compound''' - A soft rubber compound used with a tread made to maximize grip, at the cost of shorter life span and reduced fuel economy. |
| − | *'''Semi Slicks''' - A very soft rubber |
+ | *'''Semi Slicks''' - A very soft rubber compound with minimal tread pattern akin to racing tires, in order to obtain the maximum grip while remaining road legal. |
=== Tire Width === |
=== Tire Width === |
||
| − | + | Tire width can affect the tires' grip, load bearing, and rolling resistance. Because the area of contact between wheel and road is only affected by the tire's width, wider tires are superior for grip. They are also superior for load bearing, as they can spread the force of a heavy load pressing down along a greater area. The downside of wider tires is that they are more expensive and reduce fuel economy from greater rolling resistance. The minimum and maximum widths of the tires is dependent on the tire type, rim diameter, and space available in the wheel wells (which can be changed by morphing the fenders). For most average production vehicles, it is recommended to keep the front and rear wheels at the same width, as having tires of different widths greatly increases production costs. |
|
=== Parameters === |
=== Parameters === |
||
| − | Wheel parameters affect the diameter of the wheels, and the profile of the tires. Larger tire diameter increases load bearing and ride height, two positive attributes for offroad and utility vehicles, while smaller tire diameter reduces weight and rolling resistance, good benefits for cars. Smaller |
+ | Wheel parameters affect the diameter of the wheels, and the profile of the tires. Larger tire diameter increases load bearing and ride height, two positive attributes for offroad and utility vehicles, while smaller tire diameter reduces weight and rolling resistance, good benefits for cars. Smaller-diameter rims are cheaper and lighter, while larger diameter rims can fit larger brakes, improve grip, and increase prestige ratings. Both tire and rim diameters affect the tire's profile, which is the distance from the edge of the rim to the edge of the wheel (the thickness of the tire's sidewall). Larger profile tires are more comfortable and better for offroading. Rim offset affects how far outwards the rims are from the inside of the wheel wells. Usually, rim offset is increased for purely aesthetic reasons, at the (very minor) cost of some increased expense and weight. |
=== Rim Material === |
=== Rim Material === |
||
| Line 148: | Line 169: | ||
*'''Magnesium''' - lightweight, expensive metal. In the past, "mag wheels" were the top choice for performance vehicles. |
*'''Magnesium''' - lightweight, expensive metal. In the past, "mag wheels" were the top choice for performance vehicles. |
||
*'''Alloy''' - a wheel made from an aluminum based alloy. Lighter than steel, while still being relatively cheap. This wheel type is preferred for sporty and prestigious cars. |
*'''Alloy''' - a wheel made from an aluminum based alloy. Lighter than steel, while still being relatively cheap. This wheel type is preferred for sporty and prestigious cars. |
||
| − | *'''Carbon Fiber''' - the lightest, most expensive and most fragile wheel material. Used purely by |
+ | *'''Carbon Fiber''' - the lightest, most expensive and most fragile wheel material. Used purely by supercars and the like. |
=== Wheels and Tires Graph === |
=== Wheels and Tires Graph === |
||
[[File:Wheels graph.png|left|frameless|592x592px]] |
[[File:Wheels graph.png|left|frameless|592x592px]] |
||
| − | After completing your car's design, if you return to the wheel tab you will find these graphs. Like the drivetrain tab's graphs, you can see a power |
+ | After completing your car's design, if you return to the wheel tab you will find these graphs. Like the drivetrain tab's graphs, you can see a power and traction graph, but you will also see a steering graph. The steering graph is very important for tuning your car. The yellow line of the steering graph shows steering behavior at a low range of speeds (0 to 80 kmh). The car's yaw rate (how much the car is steering away from a perfectly straight direction of travel) is measured in degrees (in which the car is changing angular velocity towards the right or left) per second. |
| + | |||
| + | In order to interpret the steering graph properly, your goal is to basically stay between the blue and red lines. The blue line represents understeering, while red represents oversteering. On the yellow line there represents two points, D (critical point before understeer, for "drivablility"), and S (critical point prior to oversteer, for "sportiness"). |
||
| + | |||
| + | In order to maximize cornering g's (improving sportiness), set the S point nearest to the red line while avoiding oversteer. To maximize drivability, set the D point nearest to the blue line while avoiding understeer. RWD cars inherently oversteer, while FWD cars inherently understeer. Steering can also be affected by weight balance - a front heavy car understeers, while a rear heavy car oversteers. |
||
== Brakes == |
== Brakes == |
||
| − | [[File:Brakes.png|center|frameless| |
+ | [[File:Brakes.png|center|frameless|1056x1056px|alt=]] |
The only thing more important than going fast is stopping fast. After all, stopping is quite an important aspect in controlling a car properly. The job of the car's brakes is simple - convert the rotational movement of the wheels into heat energy, through friction, and then dissipate this heat so that the brakes can continue doing their job. This can be achieved through properly tuned brakes. If the brakes are unable to dissipate built up heat quickly enough, they will fade, meaning they will lose braking power. Underpowered brakes will usually be unable to stop the car fast enough and fade instead, while overpowered brakes will lock up the wheels, causing the car to skid further instead of properly stopping. |
The only thing more important than going fast is stopping fast. After all, stopping is quite an important aspect in controlling a car properly. The job of the car's brakes is simple - convert the rotational movement of the wheels into heat energy, through friction, and then dissipate this heat so that the brakes can continue doing their job. This can be achieved through properly tuned brakes. If the brakes are unable to dissipate built up heat quickly enough, they will fade, meaning they will lose braking power. Underpowered brakes will usually be unable to stop the car fast enough and fade instead, while overpowered brakes will lock up the wheels, causing the car to skid further instead of properly stopping. |
||
| Line 161: | Line 186: | ||
These tabs allow you to set the type of breaks in the front and rear wheels. |
These tabs allow you to set the type of breaks in the front and rear wheels. |
||
| − | *'''Drum (SLS)''' - |
+ | *'''Drum (SLS)''' - SLS (single leading shoe) drums are the simplest brakes. These old-fashioned brakes use a shoe within a drum that is pushed outwards. The brake pad on the shoe rubs against the drum (which rotates with the wheels), turning kinetic energy to heat energy and slowing the car down. These are rather weak and susceptible to brake fade. |
| − | *'''Drum (2LS)''' - |
+ | *'''Drum (2LS)''' - Double leading shoe drums are an improvement to SLS drums, in which two shoes are used instead of one. This setup is incompatible on the rear brakes, as they cannot function as an e-brake/parking brake. This brake design is more powerful and less prone to fade compared to its single-shoe counterpart, but being a drum brake, it still possesses an inherent inability to properly dissipate heat. |
| − | *'''Solid Disc''' - Solid disc brakes |
+ | *'''Solid Disc''' - Solid disc brakes replace a drum and shoes with a metal disc and a caliper. The caliper clamps down upon the disc (which rotates with the wheels), causing the car to stop. This system is superior in power to drum brakes, and is better at dissipating heat, thus better preventing fade. The downside is that disc brakes are more expensive, and more likely to be rendered less effective by dirt and mud, making them less favorable for offroad use. |
| − | *'''Vented Disc''' - The solid disc is drilled and carved in a certain manner which further promotes heat dissipation via increased surface area, and more passages for |
+ | *'''Vented Disc''' - The solid disc is drilled and carved in a certain manner which further promotes heat dissipation via increased surface area, and includes more passages for air to help carry away heat. Vented discs are also lighter than solid discs, which makes them perfect for sports cars. The obvious downside is that they are more expensive than solid discs. |
| − | *'''Carbon Ceramic''' - A special type of disc brake, where the steel disc is replaced with a carbon ceramic disc |
+ | *'''Carbon Ceramic''' - A special type of disc brake, where the steel disc is replaced with a carbon ceramic disc. As this is the same material used in a spacecraft or space shuttle's atmospheric re-entry shields, brakes made with it are quite effective at heat dissipation. The downside is that the material is very expensive, limiting its use to high-end sports cars and supercars. |
==== Option ==== |
==== Option ==== |
||
| − | Additional configuration of the disc brake's brake calipers (available on disc brakes only). More pistons |
+ | Additional configuration of the disc brake's brake calipers (available on disc brakes only). More pistons mean more stopping power and slightly reduced fade. |
=== Size === |
=== Size === |
||
| − | Adjusts the brake's diameter. Brake size ranges from a minimum of 160 mm (6.3 in), up to a maximum of 420 mm (16.5 in). Brake size is limited by the rim's diameter, as the brakes themselves have to fit within the wheel. Only rims 18" or larger can carry a 420 mm brake. Larger brakes are more powerful than smaller ones |
+ | Adjusts the brake's diameter. Brake size ranges from a minimum of 160 mm (6.3 in), up to a maximum of 420 mm (16.5 in). Brake size is limited by the rim's diameter, as the brakes themselves have to fit within the wheel. Only rims 18" or larger can carry a 420 mm brake. Larger brakes are more powerful than smaller ones and better at heat dissipation. This, of course, comes at a greater material cost. |
=== Pad Type === |
=== Pad Type === |
||
| − | Pad type determines the strength of the brake pads. Brake pads are usually made of organic materials, semi-metallic blend of materials, or full carbon ceramic depending on their applications. In the game, the pad type is determined by a slider, in which a higher number corresponds to a more aggressive pad. More aggressive |
+ | Pad type determines the strength of the brake pads. Brake pads are usually made of organic materials, semi-metallic blend of materials, or full carbon ceramic depending on their applications. In the game, the pad type is determined by a slider, in which a higher number corresponds to a more aggressive pad. More aggressive brake pads are better at dissipating heat and have superior stopping power, at the cost of comfort and greater expense. A pad type of about 35 represents the standard pads used in mass-market vehicles. |
=== Brake Bias === |
=== Brake Bias === |
||
| Line 181: | Line 206: | ||
=== Brakes Graph === |
=== Brakes Graph === |
||
[[File:Brakes graph.png|left|frameless|592x592px]] |
[[File:Brakes graph.png|left|frameless|592x592px]] |
||
| − | After completing your design, if you return to the brakes tab, you will see the graphs for braking. The first graph displays four things - front and rear wheel grip, and front and rear brake strength. The strength of brakes here is measured in newtons of force, which would be measured through equation F = ma [force = mass (of the car) × acceleration (in this case, acceleration opposite to the direction of travel, aka decceleration)] |
+ | After completing your design, if you return to the brakes tab, you will see the graphs for braking. The first graph displays four things - front and rear wheel grip, and front and rear brake strength. The strength of brakes here is measured in newtons of force, which would be measured through equation F = ma [force = mass (of the car) × acceleration (in this case, acceleration opposite to the direction of travel, aka decceleration)]. |
| + | |||
| + | As previously stated, larger brakes, with more pistons and more aggressive pad type, are stronger. To get a nicely balanced brake tune, make sure the brake strength line closely matches with the grip line, especially the rear brake/rear grip lines. The graph on the right shows braking performance, through 100 to 0 kmh tests. You can see your stopping distance (in the example = 39.1 meters), and the brake fade that occurs during these tests. Driveability is the amount of brake fade after a single use of the brakes, sportiness is rated after repeated use (to simulate a track environment), and utility is a brake test carried out will transporting full load capacity. The red line in the graph shows brake performance from top speed to standstill. Because the example car was originally electronically limited to 200 kmh, the brake test takes place from 200 to 0 kmh. |
||
== Aerodynamics == |
== Aerodynamics == |
||
| − | [[File:Aero.png|center|frameless| |
+ | [[File:Aero.png|center|frameless|1056x1056px|alt=]] |
| + | The car's aerodynamics refers to how the car interacts with the atmosphere's air while in motion. There are two types of car/air interactions measured in the game: drag and lift/downforce. |
||
| ⚫ | |||
| + | |||
| + | Drag refers to air resistance against the moving car, as the car needs to push air out of its way while moving. The faster the car moves, the more air resistance it develops as it needs to push more and more air out of the way. Drag is measured using the drag coefficient. In Automation, all car bodies have an inherent drag coefficient, which can be viewed by hovering over the car body selection in the [[Trim Design#Body Style Selection|body style selection]] tab. The drag coefficient can be modified though the use of body morphs, and the use of aerodynamic fixtures (such as lips, spoilers and wings). |
||
| + | |||
| ⚫ | The other car/air interaction looked at by the game is lift and downforce. These two work using the same principles. Lift is generated when passing air slips underneath the car, causing a higher pressure zone to be generated under the car. Lift is bad for the car's handling, especially at high speeds, as it can cause a loss of grip due to the car being lifted from the surface. In [https://www.youtube.com/watch?v=SHx9MePSBYk extreme cases], lift can cause the car to fly off the road, flip over and crash. Downforce works in the opposite direction, as air is being used to force the car down on the surface, increasing grip. Spoilers, splitters, diffusers, lips, and wings are all designed to induce downforce, by causing as much as air as possible to pass above the car, and by quickly evacuating all air from underneath the car. This creates high air pressure above the car and low air pressure below the car, causing the car to be simultaneously sucked onto the road surface and pushed onto it from above. |
||
=== Undertray === |
=== Undertray === |
||
An undertray is a metal tray that is installed underneath the car. Different trays are produced for different purposes. |
An undertray is a metal tray that is installed underneath the car. Different trays are produced for different purposes. |
||
| − | *'''Offroad Skidtray''' - A metal plate is installed under the front end of the car. It has no effect on the car's aerodynamics, but |
+ | *'''Offroad Skidtray''' - A metal plate is installed under the front end of the car. It has no effect on the car's aerodynamics, but is rather installed in order to protect the engine's oil sump and the transmission from hitting the ground. As the name implies, these plates are mainly used on offroad vehicles. |
| − | *'''Cladding''' - Various |
+ | *'''Cladding''' - Various plates are installed underneath the car. These metal plates prevent air from being trapped and circulating within the car's underbody, exhaust, driveshaft(s), and axles. This is done by allowing the air to flow along the smooth surface of the plates, reducing drag. |
| − | *'''Downforce''' - The same |
+ | *'''Downforce''' - The same plates are specially engineered to create a low pressure zone underneath the car by forcing air out of its underbody. The resulting low-pressure area under the car creates downforce. |
==== Downforce ==== |
==== Downforce ==== |
||
| Line 201: | Line 232: | ||
=== Wing Angle === |
=== Wing Angle === |
||
| − | The angle of your aerodynamic fixtures can be adjusted (not visually), allowing your wing/lips/spoilers to generate the amount of downforce you desire. Downforce affects steering grip, especially at |
+ | The angle of your aerodynamic fixtures can be adjusted (not visually), allowing your wing/lips/spoilers to generate the amount of downforce you desire. Downforce affects steering grip, especially at higher speeds. Increasing the angle sliders can create more downforce at the front or rear, at the expense of increased drag. |
=== Cooling and Brake Airflow === |
=== Cooling and Brake Airflow === |
||
| Line 208: | Line 239: | ||
=== Aerodynamics Graph === |
=== Aerodynamics Graph === |
||
[[File:Aero graph.png|left|frameless|592x592px]] |
[[File:Aero graph.png|left|frameless|592x592px]] |
||
| − | After completing your design, if you return to the aerodynamics tab, you will see the graphs for aerodynamics. The aerodynamics graph display front and rear downforce (measured in kg at certain speeds), and steering behavior at high speeds (0 to 180 kmh) |
+ | After completing your design, if you return to the aerodynamics tab, you will see the graphs for aerodynamics. The aerodynamics graph display front and rear downforce (measured in kg at certain speeds), and steering behavior at high speeds (0 to 180 kmh). |
| + | |||
| + | Most normal cars that are not equipped with any aerodynamic fixtures will generate "negative downforce", aka lift. Lift usually causes an increase in understeer at higher speeds. In a vehicle equipped with downforce fixtures, the downforce line will actually increase, generating more and more downforce at higher speeds, depending on how the front and rear wing angles were tuned. A higher wing angle will increase downforce. Ideally, you want enough to downforce to preserve sporty steering behavior without causing oversteer at high speeds (this means the car will be unstable to control even in a straight line at high speed). Too much downforce can also put strain on the suspension, as downforce acts like a weight pushing down on the car. Make sure your suspension is tight and high enough to not bottom out while the car is generating maximum downforce, or make sure your downforce is not excessive. |
||
ㅤ |
ㅤ |
||
== Interior == |
== Interior == |
||
| − | [[File:Interior.png|center|frameless| |
+ | [[File:Interior.png|center|frameless|1056x1056px|alt=]] |
| − | The interior of your car is very important in how the demographics will see your car |
+ | The interior of your car is very important in how the demographics will see your car; after all, this is the most important aspect of a car to customers, as this is what they interact with. The interior of your car can ultimately determine who wants your vehicle. It is important to note that the car's 3D interior may not represent the options selected here. |
=== Seats === |
=== Seats === |
||
| − | The seating arrangement of the car. Various body styles have different amounts of rows. The example car is a standard 4-door sedan |
+ | The seating arrangement of the car. Various body styles have different amounts of rows. The example car is a standard 4-door sedan; as a result, it only has two rows of seating. Some small sports coupe bodies only have a single row of seating, while large SUVs and wagons may have three rows of seating. Various types of seats are present in the game, and all affect car stats. |
| − | *'''+2 seating''' - +2 is the cheapest set of seats. These small stowaway seats are commonly seen in the third rows of large family cars. They sacrifice comfort and safety for practicality, as the space can either be used to transport passengers (albeit in little comfort), or the seat can be stowed away, allowing the space to be used for cargo. |
+ | *'''+2 seating''' - +2 is the cheapest set of seats. These small stowaway seats are commonly seen in the third rows of large family cars. They sacrifice comfort and safety for practicality, as the space can either be used to transport passengers (albeit in little comfort), or the seat can be stowed away, allowing the space to be used for cargo. Some car bodies, mainly coupés, strangely have a bug where there is +2 seating in the frontmost row of the car, even though it makes no sense at all. |
*'''+3 seating''' - works just like +2 seating, except instead of having two individual stowaway seats, there is a 3-seat bench that can be stowed away. Even less comfortable and safe compared to the +2 seats, but more practical as more passengers can be seated. |
*'''+3 seating''' - works just like +2 seating, except instead of having two individual stowaway seats, there is a 3-seat bench that can be stowed away. Even less comfortable and safe compared to the +2 seats, but more practical as more passengers can be seated. |
||
*'''1 seat''' - only available on the front row. Some cars may only have a driver's seat, with no passenger seating. This minimizes weight, at the expense of practicality. Single seat cars arrangements like this are exclusively used in the the most elite of super cars. |
*'''1 seat''' - only available on the front row. Some cars may only have a driver's seat, with no passenger seating. This minimizes weight, at the expense of practicality. Single seat cars arrangements like this are exclusively used in the the most elite of super cars. |
||
| Line 228: | Line 261: | ||
The interior of the car can be configured based on six standards. These standards affect what materials are used in the car's interior, and other aspects such as safety, sound deadening, cushioning etc. Over the years, what counts as "basic, standard, premium" etc. changes. However, the goal of these different interior types remains the same. |
The interior of the car can be configured based on six standards. These standards affect what materials are used in the car's interior, and other aspects such as safety, sound deadening, cushioning etc. Over the years, what counts as "basic, standard, premium" etc. changes. However, the goal of these different interior types remains the same. |
||
| − | *'''Basic Interior''' - Cheap materials, minimal sound deadening. Useful for cheap fleet vehicles |
+ | *'''Basic Interior''' - Cheap materials, minimal sound deadening. Useful for cheap fleet vehicles, base model cars, and hardcore track cars. |
| − | *'''Standard Interior''' - Run |
+ | *'''Standard Interior''' - Run-of-the-mill car interior with no special features, but adequate comfort and safety. |
*'''Premium Interior''' - Higher quality standard interior, with more careful production and superior materials. |
*'''Premium Interior''' - Higher quality standard interior, with more careful production and superior materials. |
||
| − | *'''Sport Interior''' - Interior |
+ | *'''Sport Interior''' - Interior construction changed in order to maximize weight savings. Lightweight, more expensive materials whenever possible. |
*'''Luxury''' - Highest quality mass-production interiors, a refined version of the premium interior with the best available materials. Limited production. |
*'''Luxury''' - Highest quality mass-production interiors, a refined version of the premium interior with the best available materials. Limited production. |
||
*'''Hand Made''' - Pinnacle of luxury. Primarily used in ultra-luxury vehicles of the highest standards. No mass production. |
*'''Hand Made''' - Pinnacle of luxury. Primarily used in ultra-luxury vehicles of the highest standards. No mass production. |
||
=== Entertainment === |
=== Entertainment === |
||
| − | Like the interior, the entertainment systems available change over the years. In the 1950's, an AM radio is considered a luxury, while in the 2000's such an option isn't even considered. Various entertainment systems are available throughout the years of the game, but not all together at the same time. These systems include |
+ | Like the interior, the entertainment systems available change over the years. In the 1950's, an AM radio is considered a luxury, while in the 2000's such an option isn't even considered. Various entertainment systems are available throughout the years of the game, but not all together at the same time. These systems include a phonograph, AM radio, 8-track system, cassette system, CD system, satellite navigation (SatNav), infotainment, and heads-up display (HUD). Multiple standards of these systems exist, ranging from a basic to a luxury version. |
| + | *'''None''' - Literally no entertainment. Only useful for the most barebones of cars. |
||
| ⚫ | |||
| + | |||
| − | *'''Standard Entertainment''' - More speakers, improved quality, average systems. |
||
| − | *''' |
+ | *'''Basic Entertainment''' - Few low-quality speakers, outdated or average systems. |
| − | *''' |
+ | *'''Standard Entertainment''' - More speakers improved quality, average systems. |
| ⚫ | |||
| + | *'''Luxury Entertainment''' - Top-of-the-line sound system and other cutting-edge features. |
||
== Safety and Driving Aids == |
== Safety and Driving Aids == |
||
| − | [[File:Safety.png|center|frameless| |
+ | [[File:Safety.png|center|frameless|1056x1056px|alt=]] |
| − | The car's drivability and safety is very important to the driver of the car. This tab contains systems that make driving easier, |
+ | The car's drivability and safety is very important to the driver of the car. This tab contains systems that make driving easier, potentially prevent accidents, and protect the passengers in case there are accidents. Over the years (and depending on the market), safety standards increase, and a car with too low of a safety rating can easily be totally disqualified from a market. |
=== Power Steering === |
=== Power Steering === |
||
| − | Power steering is a system which assists the driver in controlling the steering wheels, which may be difficult to control, especially in a heavy vehicle. Hydraulic power steering works by feeding high pressure hydraulic fluids in a steering booster, which helps the driver steer the wheels. This comes at the cost of complexity, cost, and, most notably, power and efficiency loss, as the engine has to be tasked with running the power steering system. To mitigate the power and efficiency losses of a hydraulic power steering system, electric power steering can be used. These systems use electric motors to boost steering, which don't depend on the engine to run |
+ | Power steering is a system which assists the driver in controlling the steering wheels, which may be difficult to control, especially in a heavy vehicle. Hydraulic power steering works by feeding high pressure hydraulic fluids in a steering booster, which helps the driver steer the wheels. This comes at the cost of complexity, cost, and, most notably, power and efficiency loss, as the engine has to be tasked with running the power steering system. To mitigate the power and efficiency losses of a hydraulic power steering system, electric power steering can be used. These systems use electric motors to boost steering, which don't depend on the engine to run. |
| + | |||
| + | Both hydraulic and electric power steering systems have a variable option. Variable power steering adjusts how much power steering boosting is given to the car depending on speed. At low speeds, steering is fully boosted, to allow the driver to easily overcome friction against the road surface, and steer the wheels. At high speeds, steering is minimally boosted, in order to making smooth and precise control easier, for moves such as lane changes while on the highway. |
||
=== Traction Aids === |
=== Traction Aids === |
||
Traction aids exist to help the driver prevent accidents by maintaining better control over the car. These traction aids are not always available, and unlock gradually over the years. |
Traction aids exist to help the driver prevent accidents by maintaining better control over the car. These traction aids are not always available, and unlock gradually over the years. |
||
| − | * '''ABS''' - Anti-lock braking systems (ABS) prevent the wheels from locking up during hard braking. In a car that lacks ABS, the wheels may lock up during hard braking, causing the car to completely lose steering ability. This, of course, is undesirable. ABS prevents wheel locking by having the computer pump the brakes |
+ | * '''ABS''' - Anti-lock braking systems (ABS) prevent the wheels from locking up during hard braking. In a car that lacks ABS, the wheels may lock up during hard braking, causing the car to completely lose steering ability. This, of course, is undesirable. ABS prevents wheel locking by having the computer pump the brakes rhythmically during hard braking. This maximizes braking potential, while minimizing wheel lock, allowing for controlability during hard braking. |
* '''TC''' - Traction control (TC) is a system in which the computer modulates the throttle to prevent wheel spin. When the wheels start spinning due to lost grip, the computer will kick in and cut power to restore traction. This system heavily cuts down on wheel spin. |
* '''TC''' - Traction control (TC) is a system in which the computer modulates the throttle to prevent wheel spin. When the wheels start spinning due to lost grip, the computer will kick in and cut power to restore traction. This system heavily cuts down on wheel spin. |
||
| − | * '''ESC''' - Electronic Stability Control (ESC) is a system which uses the brakes |
+ | * '''ESC''' - Electronic Stability Control (ESC) is a system which uses the brakes to counter oversteer and understeer. The computer uses one of the four brakes of the car to prevent loss of control in a turn, usually the outer front wheel to counter oversteer, or the inner rear wheel to counter understeer. ESC does not improve handling. |
| − | * '''LC''' - Launch Control (LC) is a system which maximizes acceleration and grip when launching the car (accelerating from standstill). It works by holding the engine at a certain RPM, preparing the drivetrain for a launch. Launch control is usually found in modern sports and |
+ | * '''LC''' - Launch Control (LC) is a system which maximizes acceleration and grip when launching the car (accelerating from a standstill). It works by holding the engine at a certain RPM, preparing the drivetrain for a launch. Launch control is usually found in modern sports cars and supercars. |
=== Safety === |
=== Safety === |
||
| − | Safety systems help protect the passenger. Over the years, safety standards and technologies |
+ | Safety systems help protect the passenger. Over the years, safety standards and technologies develop and advance. These technologies include safer body contruction, such as shatterproof safety glass and crumple zones, and interior features such as airbags and seat belts. Of course, more advanced safety comes at the cost of increased engineering and production costs. |
== Suspension == |
== Suspension == |
||
| − | [[File:Suspension.png|center|frameless| |
+ | [[File:Suspension.png|center|frameless|1056x1056px|alt=]] |
Suspension tuning of the car is both the most difficult and most important aspect of car design. Suspension tune affects every aspect of the car, and can easily make or break a design. The goal of a perfect suspension system is to maximize grip by keeping the wheels planted on the surface, and maximize comfort by keep the car's body as level as possible while traveling over bumpy terrain. |
Suspension tuning of the car is both the most difficult and most important aspect of car design. Suspension tune affects every aspect of the car, and can easily make or break a design. The goal of a perfect suspension system is to maximize grip by keeping the wheels planted on the surface, and maximize comfort by keep the car's body as level as possible while traveling over bumpy terrain. |
||
| Line 269: | Line 306: | ||
* '''Standard''' - Standard springs are simple coil springs. They are the cheapest and simplest to manufacture, are good for carrying loads, and offer consistent road feel. They are best suited for utility and inexpensive sports cars. Standard spings have a constant feel, as they exhibit the same spring rate throughout (the spring rate is a measure of how stiff the spring is). This postivally impacts sportiness, but negatively impacts comfort. |
* '''Standard''' - Standard springs are simple coil springs. They are the cheapest and simplest to manufacture, are good for carrying loads, and offer consistent road feel. They are best suited for utility and inexpensive sports cars. Standard spings have a constant feel, as they exhibit the same spring rate throughout (the spring rate is a measure of how stiff the spring is). This postivally impacts sportiness, but negatively impacts comfort. |
||
| − | * '''Progressive''' - Progressive springs are similar to standard springs. The difference between them and standard springs is their variable spring rate. At the ends of the spring, the spring has a softer spring rate, which maximizes comfort, and and the center of the spring, the spring has a harder spring rate, to prevent bottoming out. These springs are slightly more complex and expensive compared to standard springs, but |
+ | * '''Progressive''' - Progressive springs are similar to standard springs. The difference between them and standard springs is their variable spring rate. At the ends of the spring, the spring has a softer spring rate, which maximizes comfort, and and the center of the spring, the spring has a harder spring rate, to prevent bottoming out (or vice versa). These springs are slightly more complex and expensive compared to standard springs, but result in massive comfort improvements. Progressive springs are unsuitable for utility vehicles due to a reduced load-bearing capability, and unsuitable for sports cars due to their inconsistent road feel (as a result of the variable spring rate). |
| − | * '''Hydropneumatic''' - Solid mechanical springs are replaced with fluid |
+ | * '''Hydropneumatic''' - Solid mechanical springs are replaced with fluid-filled chambers. These provide excellent comfort at the cost of complexity and reliability. Hydropneumatic springs were pioneered by French automobile company Citroën in the late 1950s. The [[wikipedia:Citroën_DS|Citroën DS]]'s hydropneumatic suspension famously [http://www.bbc.com/autos/story/20130822-saved-by-a-goddess helped save French President Charles De Gaulle's life]during an assassination attempt in 1962. |
* '''Air''' - Similar to hydropneumatic suspension, except the hydraulic fluid is replaced with pressurized air. These suspension types are commonly known as air ride, and are used on heavy duty vehicles such as semi trucks. They surpass hydropneumatic suspension in reliability, and surpass progressive springs in sportiness, while maintaining similar comfort. |
* '''Air''' - Similar to hydropneumatic suspension, except the hydraulic fluid is replaced with pressurized air. These suspension types are commonly known as air ride, and are used on heavy duty vehicles such as semi trucks. They surpass hydropneumatic suspension in reliability, and surpass progressive springs in sportiness, while maintaining similar comfort. |
||
| − | * '''Active''' - Active springs are |
+ | * '''Active''' - Active springs are controlled by a computer system, which regulates the springs in order to properly react to surface conditions, and maximize comfort or sportiness (depending on which configuration is used). Active springs can be set by the driver to behave in a soft, comfortable drive mode, or a hard, sporty drive mode. |
=== Dampers === |
=== Dampers === |
||
| − | Dampers are responsible for controlling the springs. After the car rolls over a bump, the damper's job is reduce bouncing of the car, and stabilize |
+ | Dampers are responsible for controlling the springs. After the car rolls over a bump, the damper's job is to reduce bouncing of the car, and stabilize it back to its resting position. The easiest way to think of dampers is to think of them like brakes made for the springs, dissipating the spring's kinetic energy through internal friction. |
| − | * '''Twin-Tube''' - two hydraulic fluid |
+ | * '''Twin-Tube''' - two hydraulic fluid-filled pistons are used to control the spring's bouncing. The hydraulic fluid within the pistons forces them to stop, which in turn, forces the spring to stop bouncing. |
* '''Gas Mono-tube''' - works similarly to twin-tube dampers, except the hydraulic fluid is replaced with pressurized air. Improves sportiness through more consistent behavior. |
* '''Gas Mono-tube''' - works similarly to twin-tube dampers, except the hydraulic fluid is replaced with pressurized air. Improves sportiness through more consistent behavior. |
||
| − | * '''Adaptive''' - Adaptive dampening works by offering multiple |
+ | * '''Adaptive''' - Adaptive dampening works by offering multiple damping coefficients as opposed to one. This is done by the driver, who can select preset driving modes such as "sport" or "comfort" to make the dampers harder or softer respectively. This system works with hydraulic dampers, and is limited by slow changing times and a limited number of damping coefficients. |
| − | * '''Semi-Active''' - an advancement of the adaptive |
+ | * '''Semi-Active''' - an advancement of the adaptive damping system, this system reacts in real time to surface and conditions, and actively modifies its damping coefficient to best suit the needs to of the driver. This system can work to provide the best comfort or best sportiness at all times, or the best overall driving condition (an average between comfort and sportiness). |
=== Sway Bars === |
=== Sway Bars === |
||
| − | Sway bars are metal bars which |
+ | Sway bars are metal bars which connect the wheels transversely (from side to side). These metal bars transfer kinetic motion in order to limit the body from swaying side-to-side, especially during hard cornering. The larger and thicker the sway bar is, the more it is effective at reducing sway, at the cost of more weight. Looser sway bars are generally better for comfort, but too much body roll can reduce comfort. |
* '''Passive''' - Passive sway bars are simple metal rods which transfer kinetic motion transversely |
* '''Passive''' - Passive sway bars are simple metal rods which transfer kinetic motion transversely |
||
* '''Semi-Active''' - Semi active sway bars work similarly to passive sway bars, with the main exception being the fact that semi-active swaybars can change between certain preset stiffnesses. The driver can activate "sport mode", which uses the stiffest sway bar setting to limit body roll, or "normal mode", which allows for more body roll for enhanced comfort. |
* '''Semi-Active''' - Semi active sway bars work similarly to passive sway bars, with the main exception being the fact that semi-active swaybars can change between certain preset stiffnesses. The driver can activate "sport mode", which uses the stiffest sway bar setting to limit body roll, or "normal mode", which allows for more body roll for enhanced comfort. |
||
| − | * '''Offroad''' - Offroad sway bars act similarly to passive sway bars when |
+ | * '''Offroad''' - Offroad sway bars act similarly to passive sway bars when coupled, but the coupling can be disabled in order to maximize terrain traversing potential. Having no sway bars is beneficial in an offroad situation, as it allows the car's body to actively react to the terrain differences. |
| − | * '''Active''' - Active sway bars are a development of the semi-active sway bar. Unlike the semi-active system, the active system can variably stiffen and loosen itself in accordance to surface conditions and cornering. This allows the system to maximize sportiness and comfort at all times |
+ | * '''Active''' - Active sway bars are a development of the semi-active sway bar. Unlike the semi-active system, the active system can variably stiffen and loosen itself in accordance to surface conditions and cornering. This allows the system to maximize sportiness and comfort at all times. |
=== Presets === |
=== Presets === |
||
Suspension presets offer you a base tune for you car's suspension, that will fit one of six purposes. You can choose to keep a suspension preset for your final design, or you can further tune the preset to your liking. The Comfort preset softens the suspension as much as possible, to enhance comfort. The Normal preset maintains a balance of comfort, sportiness and load bearing. The Sport preset hardens the suspension, increases negative camber, and lowers the ride height for maximum handling. The Utility preset raises the ride height, and hardens the suspension, especially the rear, in order to maximize load bearing. The Offroad preset raises ride height and softens the suspension, for maximum terrain crossing capability. The Race preset works similarly to the Sport preset, but with no consideration for comfort, load bearing, or tire wear. |
Suspension presets offer you a base tune for you car's suspension, that will fit one of six purposes. You can choose to keep a suspension preset for your final design, or you can further tune the preset to your liking. The Comfort preset softens the suspension as much as possible, to enhance comfort. The Normal preset maintains a balance of comfort, sportiness and load bearing. The Sport preset hardens the suspension, increases negative camber, and lowers the ride height for maximum handling. The Utility preset raises the ride height, and hardens the suspension, especially the rear, in order to maximize load bearing. The Offroad preset raises ride height and softens the suspension, for maximum terrain crossing capability. The Race preset works similarly to the Sport preset, but with no consideration for comfort, load bearing, or tire wear. |
||
| − | === |
+ | ===Suspension Tuning=== |
The suspension tuning tab is the core of suspension design. This is where you fine tune your suspension's behavior. With control over the suspension's cambering, stiffness, dampening and sway bars, you are able to configure many of the vehicle's core attributes, such as handling, comfort and load bearing. |
The suspension tuning tab is the core of suspension design. This is where you fine tune your suspension's behavior. With control over the suspension's cambering, stiffness, dampening and sway bars, you are able to configure many of the vehicle's core attributes, such as handling, comfort and load bearing. |
||
| − | * '''Camber''' - Camber refers to the vertical angle of the car's wheels. Camber is measured in degrees offset from a straight vertical line. Positive camber is when the bottom of the wheels tuck inwards, and the top sticks outwards. Positive camber |
+ | * '''Camber''' - Camber refers to the vertical angle of the car's wheels. Camber is measured in degrees offset from a straight vertical line. Positive camber is when the bottom of the wheels tuck inwards, and the top sticks outwards. Positive camber increases tire wear and reduces grip, and is only seen in vehicles where load capacity is important. Negative camber is the opposite of positive camber. Negative camber is when the top of the wheels tuck inwards, and the bottom sticks outwards. Negative cambering improves cornering grip, at the cost of increased tire wear. A common range of camber setting in factory suspension tunes ranges from 0.0 degrees to -2.0 degrees. More negative camber is often used for sportier cars. |
* '''Springs''' - The spring values refer to the spring stiffness. Spring stifness is determined based on how heavy your car is, and what purpose you wish to accomplish with it. The springs must be stiff enough to prevent the car from bottoming out, while being soft enough to be comfortable to ride in. Stiffer springs increase load bearing and reduce bottoming out, at the cost of reduced grip and comfort. Stiff springs have reduced grip due to their reduced ability to react and conform to the road surface, compared to looser springs. However, despite all this, stiffer springs are still preferred for sportier cars in order to allow for lower ride heights by preventing bottoming out. Stiff rear springs are specifically employed by utility vehicles in order to maximize carrying capacity. |
* '''Springs''' - The spring values refer to the spring stiffness. Spring stifness is determined based on how heavy your car is, and what purpose you wish to accomplish with it. The springs must be stiff enough to prevent the car from bottoming out, while being soft enough to be comfortable to ride in. Stiffer springs increase load bearing and reduce bottoming out, at the cost of reduced grip and comfort. Stiff springs have reduced grip due to their reduced ability to react and conform to the road surface, compared to looser springs. However, despite all this, stiffer springs are still preferred for sportier cars in order to allow for lower ride heights by preventing bottoming out. Stiff rear springs are specifically employed by utility vehicles in order to maximize carrying capacity. |
||
* '''Dampers''' - The damper values refer to the dampening coefficients. Higher dampening coefficients means stiffer dampers. In turn, stiffer dampers means the suspension's springs return to a rest state quicker. Dampers that are too stiff result in lost comfort. Stiffened dampers are preferred for sports cars, as being able to return the springs to a rest state allows the full weight of the car to press on the wheels and maximize grip. |
* '''Dampers''' - The damper values refer to the dampening coefficients. Higher dampening coefficients means stiffer dampers. In turn, stiffer dampers means the suspension's springs return to a rest state quicker. Dampers that are too stiff result in lost comfort. Stiffened dampers are preferred for sports cars, as being able to return the springs to a rest state allows the full weight of the car to press on the wheels and maximize grip. |
||
| Line 302: | Line 339: | ||
=== Ride Height === |
=== Ride Height === |
||
| − | The ride height of an Automation car is a measurement of the vertical distance from the rocker panel (the bottom of the side skirts) to the surface/bottom of the tires. Ride height can be affected by tire diameter |
+ | The ride height of an Automation car is a measurement of the vertical distance from the rocker panel (the bottom of the side skirts) to the surface/bottom of the tires. Ride height can be affected by tire diameter and spring height (which is what the slider controls). A higher ride height is favored in utility and offroad vehicles, as it offers superior load capacity and ground clearance. A lower ride height is favored in sports cars due to reduced drag and centre of gravity. Depending on your [[Chassis Design#Suspension Geometry|suspension geometry]], you may have limits to what ride heights you can select. For example, pushrod suspension only allows for low ride heights, while a ''front'' solid axle only allows for a tall ride height. |
=== Suspension Graph === |
=== Suspension Graph === |
||
| Line 312: | Line 349: | ||
=== Design Mode === |
=== Design Mode === |
||
| − | [[File:Stats.png|center|frameless| |
+ | [[File:Stats.png|center|frameless|1056x1056px|alt=]] |
Once you have completed your design, you will see the vehicles statistics page. In the Design mode (the default page), you are able to see your car's top speed, 0-100 kmh time, 100-0 kmh time, quarter mile time, kilometer time, cornering G-forces, acceleration G-forces, roll angle, 100-0 braking distance, brake fade (drivability, sportiness and utility), cabin and cargo volume, front and rear downforce, curb weight, weight distribution, load and towing capacities. |
Once you have completed your design, you will see the vehicles statistics page. In the Design mode (the default page), you are able to see your car's top speed, 0-100 kmh time, 100-0 kmh time, quarter mile time, kilometer time, cornering G-forces, acceleration G-forces, roll angle, 100-0 braking distance, brake fade (drivability, sportiness and utility), cabin and cargo volume, front and rear downforce, curb weight, weight distribution, load and towing capacities. |
||
=== Market Mode === |
=== Market Mode === |
||
| − | [[File:Markets.png|center|frameless| |
+ | [[File:Markets.png|center|frameless|1056x1056px|alt=]] |
| + | In the market mode, you are able to see how your car stacks up in the markets of 5 different fictional nations: |
||
| ⚫ | |||
| + | |||
| + | * Gasmea (a representation of USA, Canada and Australia) |
||
| + | * Hetvesia (a representation of Switzerland, Germany and the Nordic Nations) |
||
| + | * Fruinia (a representation of Southern Europe and Japan) |
||
| + | * Dalluha (a representation of Saudi Arabia, Qatar and the UAE) |
||
| + | * Archana (a representation of a Communist or third-world state) |
||
| + | |||
| ⚫ | The market mode also displays various statistics of the car. These stats are drivability, sportiness, comfort, prestige, safety, practicality, utility, off-road, reliability, environmental resistance, footprint, cargo volume, passenger volume, maintenance costs (yearly), fuel economy, emissions, fuel octane requirement, material costs, production time (in months), engineering time (in months), and estimated sales price. Although the monetary value is somewhat arbitrary, the value of in-game money may resemble 2015 NZD (New Zealand dollars) or 2012 USD (United States dollars). |
||
=== Detailed Stats === |
=== Detailed Stats === |
||
| − | [[File:Detail stats.png|center|frameless| |
+ | [[File:Detail stats.png|center|frameless|1056x1056px|alt=]] |
| − | In the Detail Stats mode, you are able to review why your design got a certain drivability, sportiness, comfort, prestige or safety rating. This screen will review how all of your engineering choices affected each measurement that goes into the aformentioned statistic, and displays how the calculations work. This also works for minor statistics such as practicality, utility, offroad performance, and fuel economy. This screen also shows how the base values of each characteristic has been tested and evaluated. For example, the drivability statistic has been calculated using an evasion test (where an obstacle suddenly appears on the road in front of the car, such as in the infamous [[wikipedia:Moose_test|moose test]]), a footprint measurement (meaning how much space your car takes up |
+ | In the Detail Stats mode, you are able to review why your design got a certain drivability, sportiness, comfort, prestige or safety rating. This screen will review how all of your engineering choices affected each measurement that goes into the aformentioned statistic, and displays how the calculations work. This also works for minor statistics such as practicality, utility, offroad performance, and fuel economy. This screen also shows how the base values of each characteristic has been tested and evaluated. For example, the drivability statistic has been calculated using an evasion test (where an obstacle suddenly appears on the road in front of the car, such as in the infamous [[wikipedia:Moose_test|moose test]]), a footprint measurement (meaning how much space your car takes up - a smaller car is usually easier to control, and thus more drivable), and a controllability test (how well your car can speed up, slow down, or change direction of travel). |
=== Test Track === |
=== Test Track === |
||
| − | [[File:Tracko.png|center|frameless| |
+ | [[File:Tracko.png|center|frameless|1056x1056px|alt=]] |
The test track mode displays your vehicles performance around two test tracks - the Automation test track, which you can personally drive in through BeamNG.drive, and the Top Gear test track. The Automation test track is meant to test your car's performance to the very limit, through multiple corners, hairpins, high speed curves, and long straightaways. On the right of the screen, you can see what the AI controlling your car is doing. You see the engine's RPM, the speed at which your car is travelling, and G-forces your car is experiencing. You can also see how much throttle or braking the AI driver is doing. At the end of the lap, you can see the final track times, and attempt to match or even beat them in BeamNG.drive. |
The test track mode displays your vehicles performance around two test tracks - the Automation test track, which you can personally drive in through BeamNG.drive, and the Top Gear test track. The Automation test track is meant to test your car's performance to the very limit, through multiple corners, hairpins, high speed curves, and long straightaways. On the right of the screen, you can see what the AI controlling your car is doing. You see the engine's RPM, the speed at which your car is travelling, and G-forces your car is experiencing. You can also see how much throttle or braking the AI driver is doing. At the end of the lap, you can see the final track times, and attempt to match or even beat them in BeamNG.drive. |
||
== Summary == |
== Summary == |
||
| − | [[File:Summary2.png|center|frameless| |
+ | [[File:Summary2.png|center|frameless|1056x1056px|alt=]] |
| + | With a completed design, you can now review your car's statistics on the summary page. All pages contain the Trim Statistics section, which displays drivability, sportiness, comfort, prestige, safety, practicality, utility, offroad, fuel economy, weight, reliability, material costs, production time, and engineering time. |
||
| ⚫ | |||
| + | |||
| ⚫ | In the final page of the car designer, you are able to review your car's details and your engine's details. The car details include the car name (a placeholder name was used for the example car, but you can freely choose any name you'd like), the car type and seating, the car's dimensions, construction, drivetrain, transmission, suspension geometry and weight. The engine's details include the engine name (in this case, a custom name was used), the engine's power output, redline, block type, head type, compression ratio, fuel system, thermal efficiency and power to weight ratio. |
||
| ⚫ | In the centre of the screen, you can see engineering warnings, that show the flaws or unwanted characteristics of your car's performance, and a suggestion on how to fix the issue. Certain issues are more severe than others, as a result they come in three grades - issues that need to be noted, considered, or immediately fixed. These are all issues that may negatively impact certain car statistics. For example, the oversteer warning of the example car negatively impacts drivability and sportiness, as an oversteering car is harder to control, and prevents the car from being driven closer to its performance limits. The game suggests increasing rear grip to mitigate the issue, which can be done through many means previously mentioned. There is also a note regarding slight brake fade, with the suggestion of increasing brake size to reduce fade. Engineering warnings can be viewed from any tab in the trim designer, by hovering the cursor over the warning square on the bottom right of the UI. The warning square may appear grey (no warnings), blue (notes), yellow (considerations), or flashing red (fix needed) depending on the severity of the warnings. |
||
| + | |||
| + | On the right of the screen, there is a breakdown of each individual parts' material cost, as well as engineering and production times, with the total displayed on the bottom. Note that engineering and production times are not calculated via simple addition, rather via [https://www.youtube.com/watch?v=eaedFRcJXBU complex calculations]. |
||
| ⚫ | In the final page of the car designer, you are able to review your car's details and your engine's details. The car details include the car name (a placeholder name was used for the example car, but you can freely choose any name you'd like), the car type and seating, the car's dimensions, construction, drivetrain, transmission, suspension geometry and weight. The engine's details include the engine name (in this case, a custom name was used), the engine's power output, redline, block type, head type, compression ratio, fuel system, thermal efficiency and power to weight ratio. |
||
| + | |||
| + | With your car now complete, you can choose to export your car to BeamNG.drive by pressing the BeamNG logo button, and then drive your car in BeamNG.drive, or you can export a .car file of your car, in order to share your design with other people. Your .car files can be found in: |
||
C:\Users\''your username''\Documents\My Games\Automation\CarSaveExport |
C:\Users\''your username''\Documents\My Games\Automation\CarSaveExport |
||
With your car design now complete, feel free to make more variants of your design, or an entirely new design. You can always experiment with what works for the Automation markets, or what works for the BeamNG test track, and keep building various cars to further practice your engineering or designing skills. Have fun! |
With your car design now complete, feel free to make more variants of your design, or an entirely new design. You can always experiment with what works for the Automation markets, or what works for the BeamNG test track, and keep building various cars to further practice your engineering or designing skills. Have fun! |
||
Revision as of 16:31, 5 June 2021
Introduction
The trim designer is where you are able to finalize your car by designing and configuring its exterior, interior, drivetrain and various other aspects. The trim designer is accessible only once you have created a car model, designed the chassis, and have selected or designed an engine for your car. Each trim represents a variation of your model upon which trim(s) are based off of, and trims within a model will share common features such as chassis type and suspension geometry. However, they can exist in different body styles, have different drivetrains and engines, and have various interior configurations/options. A diverse set of trims within a model allows it to fulfill multiple roles, such as a sedate family-oriented wagon or sporty luxurious sedan.
Body Style Selection

The first page that you will see once you set up your car model and engine is the trim body selection. When choosing a model, you are given a group of related body styles, and in the trim body selection, you choose which specfic body style you want for the trim you are building. The body style variety depends on which model you have selected. Some models, such as supercars, may only have one available body, but standard passenger cars (such as the one pictured above) may be available in sedan, hatchback, wagon or coupe variants. Once you select a body, there are certain regions of the bodies that can be pushed in or pulled out in order to modify the look of the body. These regions are known as morphs, and allow for more unique designs. Morphs are not just for aesthetics; they are able to affect car stats such as drag, lift/downforce, weight, maximum tire widths and interior volume.
The body style type you choose for your trim will heavily affect what demographics your car will fit in, as it affects interior volume, door count, seating and many more variables. Body styles available in game include:
- Coupe (2-door)
- Sedan (4-door)
- Hatchback (3-door and 5-door)
- Wagon (3-door and 5-door)
- Minivan/MPV (5-door)
- Convertible (2-door, soft-top and hard-top variants)
- SUV (3-door and 5-door)
- Truck (2-door and 4-door, car-based utes and dedicated truck variants)
- Van (3-door and 5-door)
Paint

Now that you have selected your desired body style, you are now able to manipulate the paint of the car. This is done through the paint selector. The paint selector contains two columns: the scheme column (a work-in-progress feature), and the slots column. From the slots column, you are able to apply any paint color of your liking to up to 14 seperate paint slots, as well as paint all slots in a specific area at the same time. Each car body has a different amount of paint slots that affect different areas of the car; paint slots may not be 100% consistent between bodies.
These slots include the car body slots, such as the bumpers (front and rear), the hood (bonnet), the primary section of the body, the secondary section of the body (not all cars have a secondary slot), and for certain body styles, truck bed and convertible soft top slots. There are also trim slots, such as a standard trim slot (which can be any component of the car's body), window border trim, window pillars, and mirrors (older car bodies used to have mirrors integrated into the body itself, but now the mirror slot is used as an extra slot in most bodies). The wheel slots include the primary zone of the wheel, secondary zone, wheel rim, and brake caliper.
Paint Applicator

Once you select a certain slot for painting, you can now select the paint you want to apply to the selected slot. The types of paints you can select include 'on car' paints, 'global' paints, and 'default' paints.
Default paints: Includes the game's default materials, such as soft top vinyl, plastic, carbon fiber, the default red metallic paint, beige leather, aluminum, cloth, chrome and steel.
On car: Paints that are custom-made by the user, and that are or were used in one of the car's slots. Accessible only from the specific trim applied to.
Global: Paints that are custom-made by the user. Accessible from any trim.
By pressing the large paint bucket or ABC button, you can change the way your paints are organized (either by hue, or by alphabetical order of name). If you wish to create a new paint, simply press the large + next to the paint bucket/ABC button. When you do this, you will access the paint maker.
Paint Designer (Simple)

In the paint maker, you can select various parameters to create a new paint. The first of which is the material parameter, which controls the base material of the paint. These are the same materials present in the default paint group. Once you select your desired base material, you can now choose the color. There are 147 different hues available for your paint. After you select your color, you can configure the shine of the paint (meant to simulate clearcoat), and flake (meant to simulate metallic paints). In the preview slot, you can see the final result of your paint design, and edit its name. Hitting the check button confirms your choice, and X cancels the choices. If you feel like the simplified paint maker is too limiting in paint choices, selected the paint bucket button on the bottom right will lead you to the advanced paint maker.
Paint Designer (Advanced)

In the advanced paint maker, you are able to fine tune your paint's characteristics. You can modify your paint's hue (color), saturation (how rich in colour your paint is), and value (how bright your paint is). You are also able to fine tune your paint's shine and flakiness. In the simple paint designer, the shine settings of high, medium, and low are equivalent to 1.0, 0.5, and 0.1 shine respectively, while the flake settings of high, medium, and none are equivalent to 1.0, 0.5, and 0.0 flake respectively. The advanced paint designer also allows you to add pearlescent effects to your paint, which modifies how it shines and reflects. By default, the pearl color is white (meaning there are no pearlescent effects).
Fixtures

The central aspect of your car's aesthetic design revolves around the use of fixtures. Fixtures are various 3D models of items such as headlights, grilles, license plates, and the like that you can place on (or in) your car in order to make it look like a proper car rather than a blank body shell. There are 1,918 fixtures in game, and many more available through the Steam Workshop as mods. All mod fixtures (and bodies) have a banner on the corner of their thumbnail labelling them as mods.
Fixture Categories
Fixtures are organized by their types, as there are many different fixtures in game (as evidenced by the high fixture count). There are six categories of fixtures - lighting, cooling, aerodynamics, and three miscellaneous categories.
- In the lighting category, you can find headlights, taillights and indicators/side markers.
- In the cooling category, you can find fixtures such as grills, vents, scoops, and sunroofs/windows.
- In the aerodynamics category, you can find lips and diffusers, spoilers, and wings.
- In miscellaneous 1, you can find gas caps, door handles and mirrors.
- In miscellaneous 2, you can find antennas, license plates, bumper bars, and badging.
- In miscellaneous 3, you can find wheels, exhaust tips, miscellaneous fixtures, and a tow hitch.
Most fixtures are purely aesthetic, but aero fixtures will affect drag, lift and downforce characteristics, and the tow hook fixture is functional in BeamNG.drive. The exhaust tips also act as a source for exhaust fumes and afterfire in BeamNG.drive, but those are simply aesthetic effects.
Fixture Placement and Editing

Fixtures can be modified in many ways. To begin, many fixtures in game exist as a group of various fixtures, such as this rectangular sealed beam headlight, which exists in 10 different variations. There are various ways to edit the fixtures themselves, change how they interact with the car body, and change how they interact with each other.
To go over the fixture editor, we will start with the upper left corner, at the 1/4 button. This is the fixture layering area, which allows fixtures to sit directly on top of other fixtures, hiding the lower layered fixture below. Two fixtures sitting in the same area on the same layer may result in flickering known as Z-fighting, mitigated by having one fixtured layered on top of the other. Fixture layering may be useful for blending multiple fixtures into one design element, or hiding away an undesirable part of another fixture.
Next to the layering options, there are two buttons for resetting the fixture's scaling and rotation back to their default values.
Next to that is the rotation setting. You can choose to type in your own rotation angle (between -360 and 360 degrees) to fine-tune your fixture placement. The two buttons next to the rotation angle are buttons made to rotate the selected fixture by 90 degrees, counter-clockwise or clockwise. The next two buttons flip your fixture along the vertical or horizontal axis respectively. The button next to the flipping buttons toggles fixture mirroring on or off.

Three identical fixtures, interacted with the body in three different manners. Left to right: cardinal lock, align to body, align to horizon
The next three buttons modify how the fixture interacts with the car body. These buttons are (from left to right), 'align to body', 'cardinal lock', and 'align to horizon'. The align to body function causes the fixture to align itself based on the car's geometry, allowing the fixture to follow the shape and contouring of the body. The second function, cardinal lock, forces the fixture to face one of six cardinal directions: up, down, left, right, forwards, and backwards. The third function, align to horizon, works similarly to cardinal lock, except the up and down directions are disabled, meaning the fixture can only face forward, backwards, left or right. Due to a bug, the 'align to horizon' setting can only be enabled if the fixture was set to 'align to body' first.
ㅤ
ㅤ
ㅤ
After the direction modifying functions, the rest are utility functions. The first, represent by a trash can icon, is for deleting the selected fixture. The next two are undo and redo buttons. The padlock represents a locking feature, which locks the selected fixture so that it cannot be moved, rotated or scaled. The final checkmark button unselects the fixture.
On the top right of the fixture selection area is a circle and a magnet button. The circle button toggles fixture highlights, which means that selected fixtures have a thin green outline, and fixtures being hovered over have a yellow outline. By default, this feature is on. The magnet button represents center snapping, which causes fixtures to automatically snap to the center of the car body when enabled (by default, it is on).

The final aspect of fixture manipulation is the material editing area. Most fixtures, with the exception of badges, have areas that can have their materials edited, and different areas can accept different types of materials. There are five groups of materials (shown on the left), and each material editing slot can access only one of the five material groups (the creator of the fixture decides which material group each material slot uses). For example, plate slots can only accept plate materials, and glass slots can only accept glass materials. Material selection is quite an important feature, as it allows any fixture to be used for anything.
One of the most important hints regarding car design within the game is to learn how to use fixtures for purposes they were not made for, which can be achieved through creative use of materials.
There isn't much that can be said about creating a good-looking design, as looks are subjective and unable to be measured objectively. The best design advice is to look at real cars from the same time period as your creation, and use similar fixtures and design cues (for example, using circular sealed beam headlights and lots of chrome accents on a 1960's American car build). The second best advice for creating good visual designs is to visit the forum and the Automation Discord, where other players will be able to guide and critique your design(s).
Drivetrain

Now with the aesthetics out of the way, it is time to focus on the guts of your car, beginning with power delivery. For the power to get from your engine to the wheels, it needs to be transferred through a mechanical system known as the drivetrain (or, less commonly, driveline).
Drive Type
Various drive types are available depending on how your model was originally set up, specifically the engine layout and suspension design. Using different drive wheels (such as the front wheels, rear wheels, or all four wheels - part time or full time) can heavily modify your car's driving dynamics. Remember that all drive types have the potential to be sporty depending on the engine powering your car, and your tuning, and vice-versa - all drive types can be made into mundane average cars. Available drive types depend on the car's engine layout and available space within the engine bay.
- Front-wheel drive [FWD] - Considered simple and easy to drive, and usually installed on average, economical, safe, family and commuter vehicles. Available on cars with front-longitudinal and front-transverse layouts.
- Rear-wheel drive [RWD] - Considered sporty, usually installed on premium and sporty cars. Not as economical as FWD, but more economical than 4x4 and AWD. Also installed on vehicles that carry lots of heavy loads in the rear, such as trucks, utility vans, and utes. Available on cars with front-longitudinal, mid-longitudinal, mid-transverse and rear-longitudinal layouts.
- All-wheel drive [AWD] - Considered easy to drive or sporty. Installed on all types of cars. Less economical than FWD and RWD, due to the weight of the AWD system and reduced efficiency in powering four wheels instead of two. AWD's main advantage is its ability to avoid wheel spin by spreading power to four wheels intead of two. Available on cars with any engine layout except for the mid-transverse layout.
- Four-by-four [4x4] - Is made exclusively for utility and offroad vehicles. Least economical of all drivetrains, due to heavy weight. 4x4's main advantage is the ability to be turned on or off, and its ability to traverse rough terrain. When turned off, 4x4 acts like RWD, powering only the rear wheels. Only available on cars with front-longitudinal engine layouts.
Gearbox
The gearbox is responsible for delivering power from the engine to the drive system and wheels. A gearbox is a set of gears whose job is to synchronize the rotation of the wheels to the rotation of the engine. Through torque multiplication and multiple gear ratios, the transmission is able to keep the wheels spinning at higher and higher speeds while preventing the engine from spinning too fast, by employing a longer gear that keeps wheel speed high and engine speed low. Automation currently has five gearbox types.
- Automatic - a classic mechanically operated automatic transmission. Colloquially known as a "slushbox", these transmission types are the worst for performance and efficiency, but greatly surpass most transmissions in drivability. These automatic transmissions came before the use of onboard computers, and were retired with the advent of ECUs in cars.
- Advanced Automatic - a modern automatic transmission system, operated by the onboard computer. These transmissions are more efficient, shift quicker, and are even more drivable than classical automatic transmissions. These transmissions can also be switched to a manual shifting mode.
- Manual - the standard transmission, operated via a gear select lever and clutch pedal. These transmissions exceed all others in cheapness, efficiency and sportiness thanks to their solid clutch as opposed to the fluid torque converters of an automatic transmission. However, these transmissions are the hardest to drive, as they require good handling of the clutch.
- Sequential - a spin-off of the manual transmission, with an automated clutch and inability to skip gears. The drive can only shift up to the next gear or down to the previous gear. Boasted superior performance to a manual thanks to quicker shifting times, and was used in sports cars and supercars of the 2000s. Superseded by dual-clutches in road cars due to its harshness, but common in race cars. (Note that in BeamNG.drive, the clutch in a sequential transmission is manual like those introduced in the 0.11 update for that game and thus must be launched manually.)
- Dual-Clutch - an evolution of the sequential transmission, with two automated clutches. This transmission type fully replaced the sequential in road cars, and is usually equipped in modern sports cars and supercars.
Ratios
The gearbox can have multiple gears (from 2 to 9). Fewer gears mean a lighter, simpler and cheaper gearbox. Having more gears means more ratios to work with, leading to potentially faster acceleration and better fuel economy. Only automatic transmissions may have more than 7 gears.
Top Speed
The top speed slider manages the ratios of each gear in the transmission, as well as the final drive ratio. The game will calculate an estimated top speed for your car based on its drag coefficient, weight, and engine power. Based on this information, you can set up your gearing. Shorter gearing (with a lower top speed) allows for theoretically quicker acceleration (as long as your car can maintain grip), while longer gearing (with a higher top speed) allows for better fuel economy and reduced wheel spin. If your gearing goes beyond your top speed, your longest gears will have a ratio of less than one, making them overdrive gears. Overdrive gears are great for fuel economy, as they allow your car to cruise at highway speeds while the engine operates at a lower, more efficient RPM range, usually 1500 to 3500 RPM.
If your car's engine is equipped with a fuel injection system (as opposed to a carburetor), you can also electronically limit its top speed using the +/- buttons. A lower top speed reduces costs, as you don't need to use more expensive wheels and tires rated for higher speeds, and a higher top speed (to a certain attainable point) will increase your vehicle's sportiness and prestige.
Spacing
The spacing slider controls the spacing between the ratios of the transmission's gears; it modifies the ratios of the all the gears except the final gear. Lowered spacing reduces wheel spin, and keeps the engine running at higher RPM when shifting up. This setup is most favorable in sports cars. Increased spacing does the opposite; it allows the engine to quickly shoot up to high RPM, and then drop to a much lower RPM when shifting up. This setup is favored on utility and offroad vehicles, to help them accelerate while traveling over bad terrain or while carrying heavy loads. A normal car will benefit most from an average gear spacing setup (the default value), as it is best for fuel economy.
Differentials
The differential is a drivetrain component that takes a power input from the transmission or driveshaft and outputs the power to the drive wheels, while accounting for differences in individual wheel speed in corners or on uneven terrain. The differential is responsible for splitting power as equally as possible between the driven wheels. A car can have one to three differentials, depending on drive type. A 2WD drivetrain (front or rear wheel drive) only needs one differential to split power between the left and right drive wheels, while an AWD drivetrain needs three differentials - one to split power between the front and rear axles, one to split power between the front wheels, and one to split power between the rear wheels. A 4x4 drivetrain uses two differentials - one for each pair of driven wheels - and a transfer case, which can be toggled between 2WD and 4WD, by either running all power to the rear wheels or transferring power to the front at the operator's discretion. The difference between differentials is how they carry this task out.
- Open - the open differential is the simplest and cheapest differential. However, its main flaw is that is sends power through the path of least resistance. This means all the power will go through a wheel that might have lost grip due to any reason (e.g. a drive wheel on the inside of a turn due to the reduced weight resting on it), and it will spin that wheel alone. These are called "one-wheel peels", and are the reason why open differentials are the least sporty.
- Locking (Manual/Automatic) - the locking differential is a bit more complex that the open differential. It is able to lock itself, which means it forces both wheels to spin at the same speed, preventing one-wheel peels. This is good for offroad use, where softer dirt and mud can easily be overcome. However, these types of differentials are bad for on-road use, as when a car turns, the wheels have to spin at different speeds. If they don't, it will cause premature tire wear. This is why locking differentials can be engaged/disengaged, either manually via a lever or button, or automatically. Manually locking differentials are preferred over the automatic system, as they give more control to the driver and are less complex than their automatic counterpart.
- LSD (Limited Slip Differential) - the LSD is the most complex of the differentials. Three versions exist in the game, which accomplish the same task through different means. Their goal is to reduce wheel spin and afformentioned "one-wheel peels" by limiting slip (hence the name), all while maintaining on-road drivability. This is done by an internal mechanism which partially locks the wheels only when one starts slipping. This means that while both wheels don't spin at the same speed (as in a locking differential), they spin at closer speeds than what an open differential allows. This can be done via a viscous liquid coupling in a viscous LSD (similar to an automatic transmission's torque converter), mechanical spider gears in a geared LSD, or electronically engaged clutches in an electronic LSD.
Power Distribution
An option only available for AWD drivetrains, this slider controls how much power is recieved by the front and rear wheels respectivelly. Usually, it is best to tune this setting in order to limit wheel spin, by making the power balance favor the tires with the most grip.
Drivetrain Graph

After completing your car's design, you can go back to the drivetrain tab and review the drivetrain graphs. These graphs show you the gearing (in power to the wheels) at a certain speed, and traction (in acceleration force [g] at a certain speed, as well as the grip of the powered wheels).
The gearing graph's green lines are a representation of your engine's power output from idle to redline, showing how your car's engine and transmission would behave when accelerating from standstill to top speed. You can see at what speeds your car would shift up, and how much power you are making at a certain speed. Remember, the gearing graph shows wheel power as opposed to crank power in order to take in account power losses from the drivetrain. Some transmissions suffer fewer power losses than others; for example, a 2020 DCT transmission is much better at reducing power loss than a 1950 automatic. However, all transmissions have varying degrees of power loss. The power vs traction graph shows how good of a job your drivetrain and wheels are doing at accelerating the car. At low speeds, acceleration is usually limited by tire grip.
ㅤ
Wheels and Tires

Your car's wheels are an important component. Without them, your car is just a fancy mechanical ornament with lights and a complex, noisy smoke machine. Good wheels can make or break a car design, so its important to know what you're doing here. Your wheels can be the determining factor as to what your car is capable of doing.
Tire Type
There are two types of tires that have been used in automotive history - cross ply (aka bias ply) and radial tires. The difference lies in their internal structure and contruction. Cross ply tires contain a tightly woven tubular interior that is stiff and resistant to too much flexing. Radial tires replace the woven interior tube with a steel belt wrapped with rubber. These different constructions lead to the tire types having different properties. Today, radial tires have fully replaced cross ply tires in the automotive industry, though cross ply tires remain in use for bicycles.
- Cross ply advantages - Cheaper, better load bearing (compared to a radial tire of same width and compound type).
- Radial advantages - allows for wider, lower-profile tires (which maximizes grip and performance), and allows for larger rims. Can offset any load-bearing disadvantages by simply being wider.
Tire Choice
Tire choice covers various types of rubber compounds. Different rubber compounds are made through varying proportions of rubber, carbon, oils, and sulphur (induced by vulcanization). The tire compounds also have different tire tread patterns, to either maximize drivability or grip. Harder tire compounds have reduced rolling resistance and increased load-bearing ability, while softer compounds have reduced road noise and increased grip.
- Chunky Offroad - Uses a hard rubber compound, and a chunky tire tread to easily dig through dirt, mud and sand. Cheap to make, but produces the most road noise, leading to an uncomfortable ride. Least road grip out of all tire compounds.
- Hard Long Life - Uses a hard rubber compound, and a regular tire tread to maximize ease of driving (by displacing plenty of water in rainy conditions). Least rolling resistance of all tire types, allowing for maximized fuel economy and reduced wear at the cost of grip.
- Medium Compound - A softer rubber compound is used with a regular tire tread to maximize driving comfort and improve grip over hard long life tires.
- Sports Compound - A soft rubber compound used with a tread made to maximize grip, at the cost of shorter life span and reduced fuel economy.
- Semi Slicks - A very soft rubber compound with minimal tread pattern akin to racing tires, in order to obtain the maximum grip while remaining road legal.
Tire Width
Tire width can affect the tires' grip, load bearing, and rolling resistance. Because the area of contact between wheel and road is only affected by the tire's width, wider tires are superior for grip. They are also superior for load bearing, as they can spread the force of a heavy load pressing down along a greater area. The downside of wider tires is that they are more expensive and reduce fuel economy from greater rolling resistance. The minimum and maximum widths of the tires is dependent on the tire type, rim diameter, and space available in the wheel wells (which can be changed by morphing the fenders). For most average production vehicles, it is recommended to keep the front and rear wheels at the same width, as having tires of different widths greatly increases production costs.
Parameters
Wheel parameters affect the diameter of the wheels, and the profile of the tires. Larger tire diameter increases load bearing and ride height, two positive attributes for offroad and utility vehicles, while smaller tire diameter reduces weight and rolling resistance, good benefits for cars. Smaller-diameter rims are cheaper and lighter, while larger diameter rims can fit larger brakes, improve grip, and increase prestige ratings. Both tire and rim diameters affect the tire's profile, which is the distance from the edge of the rim to the edge of the wheel (the thickness of the tire's sidewall). Larger profile tires are more comfortable and better for offroading. Rim offset affects how far outwards the rims are from the inside of the wheel wells. Usually, rim offset is increased for purely aesthetic reasons, at the (very minor) cost of some increased expense and weight.
Rim Material
Controls what material is used for building the rims. Lighter wheels are more favorable for performance applications, as the reduced rotational mass improves driving dynamics and handling.
- Steel - the cheapest, most basic material for wheels. Preferred for utility and offroad vehicles, as they are cheap and rugged.
- Magnesium - lightweight, expensive metal. In the past, "mag wheels" were the top choice for performance vehicles.
- Alloy - a wheel made from an aluminum based alloy. Lighter than steel, while still being relatively cheap. This wheel type is preferred for sporty and prestigious cars.
- Carbon Fiber - the lightest, most expensive and most fragile wheel material. Used purely by supercars and the like.
Wheels and Tires Graph
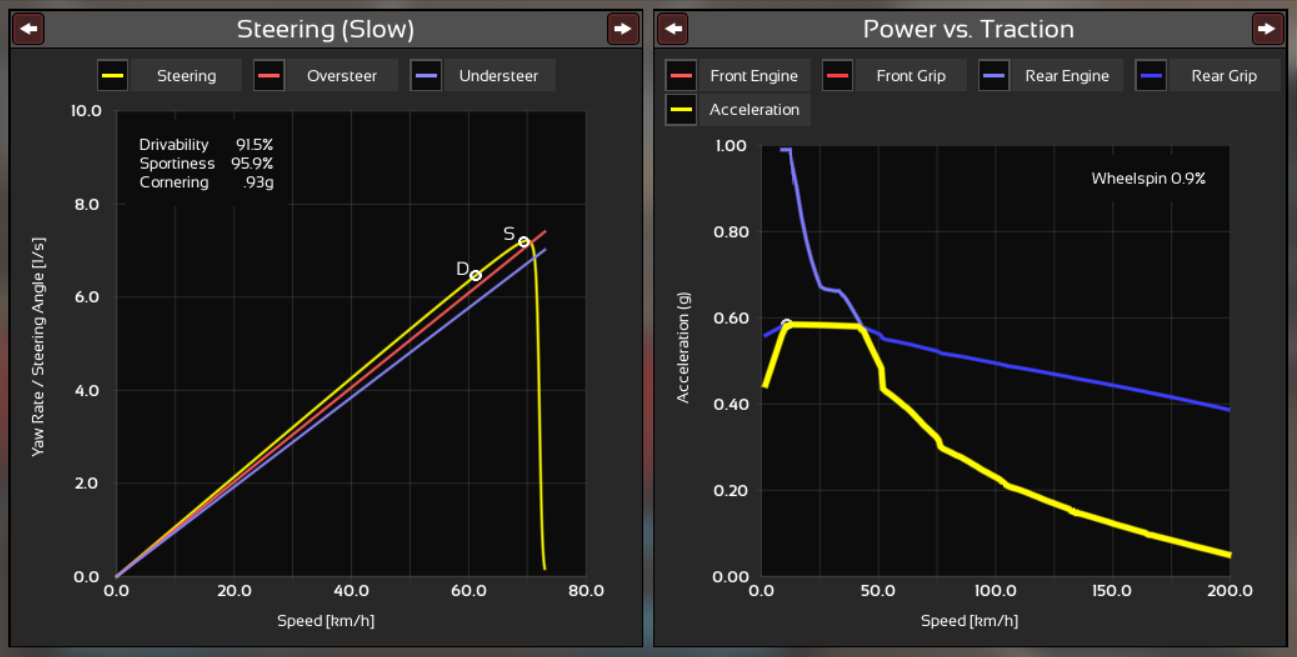
After completing your car's design, if you return to the wheel tab you will find these graphs. Like the drivetrain tab's graphs, you can see a power and traction graph, but you will also see a steering graph. The steering graph is very important for tuning your car. The yellow line of the steering graph shows steering behavior at a low range of speeds (0 to 80 kmh). The car's yaw rate (how much the car is steering away from a perfectly straight direction of travel) is measured in degrees (in which the car is changing angular velocity towards the right or left) per second.
In order to interpret the steering graph properly, your goal is to basically stay between the blue and red lines. The blue line represents understeering, while red represents oversteering. On the yellow line there represents two points, D (critical point before understeer, for "drivablility"), and S (critical point prior to oversteer, for "sportiness").
In order to maximize cornering g's (improving sportiness), set the S point nearest to the red line while avoiding oversteer. To maximize drivability, set the D point nearest to the blue line while avoiding understeer. RWD cars inherently oversteer, while FWD cars inherently understeer. Steering can also be affected by weight balance - a front heavy car understeers, while a rear heavy car oversteers.
Brakes

The only thing more important than going fast is stopping fast. After all, stopping is quite an important aspect in controlling a car properly. The job of the car's brakes is simple - convert the rotational movement of the wheels into heat energy, through friction, and then dissipate this heat so that the brakes can continue doing their job. This can be achieved through properly tuned brakes. If the brakes are unable to dissipate built up heat quickly enough, they will fade, meaning they will lose braking power. Underpowered brakes will usually be unable to stop the car fast enough and fade instead, while overpowered brakes will lock up the wheels, causing the car to skid further instead of properly stopping.
Front Brakes and Rear Brakes
These tabs allow you to set the type of breaks in the front and rear wheels.
- Drum (SLS) - SLS (single leading shoe) drums are the simplest brakes. These old-fashioned brakes use a shoe within a drum that is pushed outwards. The brake pad on the shoe rubs against the drum (which rotates with the wheels), turning kinetic energy to heat energy and slowing the car down. These are rather weak and susceptible to brake fade.
- Drum (2LS) - Double leading shoe drums are an improvement to SLS drums, in which two shoes are used instead of one. This setup is incompatible on the rear brakes, as they cannot function as an e-brake/parking brake. This brake design is more powerful and less prone to fade compared to its single-shoe counterpart, but being a drum brake, it still possesses an inherent inability to properly dissipate heat.
- Solid Disc - Solid disc brakes replace a drum and shoes with a metal disc and a caliper. The caliper clamps down upon the disc (which rotates with the wheels), causing the car to stop. This system is superior in power to drum brakes, and is better at dissipating heat, thus better preventing fade. The downside is that disc brakes are more expensive, and more likely to be rendered less effective by dirt and mud, making them less favorable for offroad use.
- Vented Disc - The solid disc is drilled and carved in a certain manner which further promotes heat dissipation via increased surface area, and includes more passages for air to help carry away heat. Vented discs are also lighter than solid discs, which makes them perfect for sports cars. The obvious downside is that they are more expensive than solid discs.
- Carbon Ceramic - A special type of disc brake, where the steel disc is replaced with a carbon ceramic disc. As this is the same material used in a spacecraft or space shuttle's atmospheric re-entry shields, brakes made with it are quite effective at heat dissipation. The downside is that the material is very expensive, limiting its use to high-end sports cars and supercars.
Option
Additional configuration of the disc brake's brake calipers (available on disc brakes only). More pistons mean more stopping power and slightly reduced fade.
Size
Adjusts the brake's diameter. Brake size ranges from a minimum of 160 mm (6.3 in), up to a maximum of 420 mm (16.5 in). Brake size is limited by the rim's diameter, as the brakes themselves have to fit within the wheel. Only rims 18" or larger can carry a 420 mm brake. Larger brakes are more powerful than smaller ones and better at heat dissipation. This, of course, comes at a greater material cost.
Pad Type
Pad type determines the strength of the brake pads. Brake pads are usually made of organic materials, semi-metallic blend of materials, or full carbon ceramic depending on their applications. In the game, the pad type is determined by a slider, in which a higher number corresponds to a more aggressive pad. More aggressive brake pads are better at dissipating heat and have superior stopping power, at the cost of comfort and greater expense. A pad type of about 35 represents the standard pads used in mass-market vehicles.
Brake Bias
Adjusts the balance between front and rear brakes, ranging from 50/50 brake power distribution, to 75/25 (F/R). Brakes in cars are hydraulically operated, and by adjusting brake bias, you adjust how much brake fluid pressure makes it to the front and rear brakes, as higher pressure forces the brake to work harder.
Brakes Graph

After completing your design, if you return to the brakes tab, you will see the graphs for braking. The first graph displays four things - front and rear wheel grip, and front and rear brake strength. The strength of brakes here is measured in newtons of force, which would be measured through equation F = ma [force = mass (of the car) × acceleration (in this case, acceleration opposite to the direction of travel, aka decceleration)].
As previously stated, larger brakes, with more pistons and more aggressive pad type, are stronger. To get a nicely balanced brake tune, make sure the brake strength line closely matches with the grip line, especially the rear brake/rear grip lines. The graph on the right shows braking performance, through 100 to 0 kmh tests. You can see your stopping distance (in the example = 39.1 meters), and the brake fade that occurs during these tests. Driveability is the amount of brake fade after a single use of the brakes, sportiness is rated after repeated use (to simulate a track environment), and utility is a brake test carried out will transporting full load capacity. The red line in the graph shows brake performance from top speed to standstill. Because the example car was originally electronically limited to 200 kmh, the brake test takes place from 200 to 0 kmh.
Aerodynamics

The car's aerodynamics refers to how the car interacts with the atmosphere's air while in motion. There are two types of car/air interactions measured in the game: drag and lift/downforce.
Drag refers to air resistance against the moving car, as the car needs to push air out of its way while moving. The faster the car moves, the more air resistance it develops as it needs to push more and more air out of the way. Drag is measured using the drag coefficient. In Automation, all car bodies have an inherent drag coefficient, which can be viewed by hovering over the car body selection in the body style selection tab. The drag coefficient can be modified though the use of body morphs, and the use of aerodynamic fixtures (such as lips, spoilers and wings).
The other car/air interaction looked at by the game is lift and downforce. These two work using the same principles. Lift is generated when passing air slips underneath the car, causing a higher pressure zone to be generated under the car. Lift is bad for the car's handling, especially at high speeds, as it can cause a loss of grip due to the car being lifted from the surface. In extreme cases, lift can cause the car to fly off the road, flip over and crash. Downforce works in the opposite direction, as air is being used to force the car down on the surface, increasing grip. Spoilers, splitters, diffusers, lips, and wings are all designed to induce downforce, by causing as much as air as possible to pass above the car, and by quickly evacuating all air from underneath the car. This creates high air pressure above the car and low air pressure below the car, causing the car to be simultaneously sucked onto the road surface and pushed onto it from above.
Undertray
An undertray is a metal tray that is installed underneath the car. Different trays are produced for different purposes.
- Offroad Skidtray - A metal plate is installed under the front end of the car. It has no effect on the car's aerodynamics, but is rather installed in order to protect the engine's oil sump and the transmission from hitting the ground. As the name implies, these plates are mainly used on offroad vehicles.
- Cladding - Various plates are installed underneath the car. These metal plates prevent air from being trapped and circulating within the car's underbody, exhaust, driveshaft(s), and axles. This is done by allowing the air to flow along the smooth surface of the plates, reducing drag.
- Downforce - The same plates are specially engineered to create a low pressure zone underneath the car by forcing air out of its underbody. The resulting low-pressure area under the car creates downforce.
Downforce
The downforce slider controls how much downforce is generated by the downforce undertray. More downforce comes at the expense of more drag.
Active Aero
Active aerodynamics are a set of wings, spoilers, and cooling flaps that can be adjusted in real-time. Active aero allows the car to have reduced drag under normal driving conditions by stowing away the wing and shutting the cooling flaps, and then increase the downforce and cooling for engine/brakes when enabled. This is found in many modern sports cars, where a sport or track mode enables the wing to lift up and opens various cooling flaps, designed for track conditions.
Wing Angle
The angle of your aerodynamic fixtures can be adjusted (not visually), allowing your wing/lips/spoilers to generate the amount of downforce you desire. Downforce affects steering grip, especially at higher speeds. Increasing the angle sliders can create more downforce at the front or rear, at the expense of increased drag.
Cooling and Brake Airflow
The amount of air that is used to cool down the engine. The default value is 50, which corresponds to exactly how much cooling your engine requires (which can be seen in the engine designer). More cooling increases reliability, at the expense of increased drag. Brake airflow allows the brakes to be cooled off using airflow controlled via vents. Increased brake cooling reduces brake fade, at the expense of more drag. By default, brake cooling is at zero, as most normal production cars do not employ specialized brake cooling vents and ducts.
Aerodynamics Graph
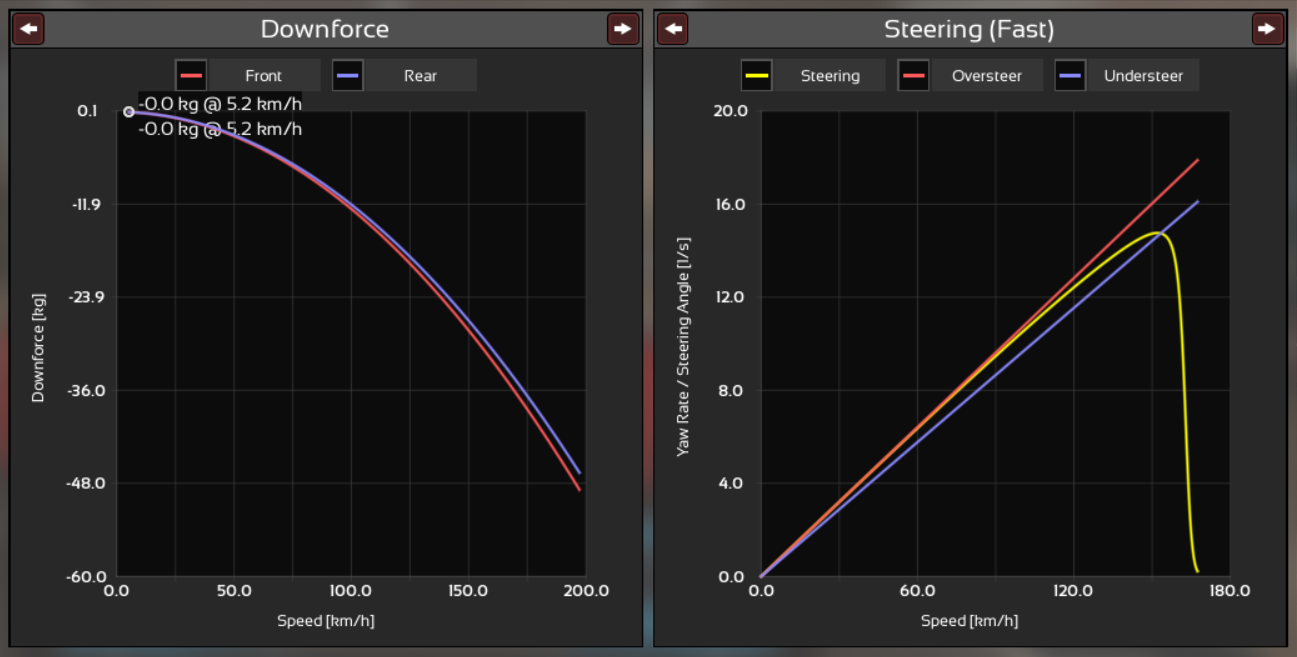
After completing your design, if you return to the aerodynamics tab, you will see the graphs for aerodynamics. The aerodynamics graph display front and rear downforce (measured in kg at certain speeds), and steering behavior at high speeds (0 to 180 kmh).
Most normal cars that are not equipped with any aerodynamic fixtures will generate "negative downforce", aka lift. Lift usually causes an increase in understeer at higher speeds. In a vehicle equipped with downforce fixtures, the downforce line will actually increase, generating more and more downforce at higher speeds, depending on how the front and rear wing angles were tuned. A higher wing angle will increase downforce. Ideally, you want enough to downforce to preserve sporty steering behavior without causing oversteer at high speeds (this means the car will be unstable to control even in a straight line at high speed). Too much downforce can also put strain on the suspension, as downforce acts like a weight pushing down on the car. Make sure your suspension is tight and high enough to not bottom out while the car is generating maximum downforce, or make sure your downforce is not excessive.
ㅤ
Interior

The interior of your car is very important in how the demographics will see your car; after all, this is the most important aspect of a car to customers, as this is what they interact with. The interior of your car can ultimately determine who wants your vehicle. It is important to note that the car's 3D interior may not represent the options selected here.
Seats
The seating arrangement of the car. Various body styles have different amounts of rows. The example car is a standard 4-door sedan; as a result, it only has two rows of seating. Some small sports coupe bodies only have a single row of seating, while large SUVs and wagons may have three rows of seating. Various types of seats are present in the game, and all affect car stats.
- +2 seating - +2 is the cheapest set of seats. These small stowaway seats are commonly seen in the third rows of large family cars. They sacrifice comfort and safety for practicality, as the space can either be used to transport passengers (albeit in little comfort), or the seat can be stowed away, allowing the space to be used for cargo. Some car bodies, mainly coupés, strangely have a bug where there is +2 seating in the frontmost row of the car, even though it makes no sense at all.
- +3 seating - works just like +2 seating, except instead of having two individual stowaway seats, there is a 3-seat bench that can be stowed away. Even less comfortable and safe compared to the +2 seats, but more practical as more passengers can be seated.
- 1 seat - only available on the front row. Some cars may only have a driver's seat, with no passenger seating. This minimizes weight, at the expense of practicality. Single seat cars arrangements like this are exclusively used in the the most elite of super cars.
- 2 seats - the standard arrangement for the front seating arrangement of most cars. Two full seats are side by side, seperated by empty space. This allows for additional comfort, at the expense of practicality. Some cars also use this arrangement for the rear seats, for example in a 2+2 sports car with seating for a total of four.
- 3 seats - a full bench seat, commonly used in the rear seat of two-row cars, and the middle row of 3-row cars. In the past, large family cars also had a front full bench seat, however this was phased out due to poor safety rating of a front bench seat. Bench seats maximize on practicality while still retaining some safety and comfort.
Interior
The interior of the car can be configured based on six standards. These standards affect what materials are used in the car's interior, and other aspects such as safety, sound deadening, cushioning etc. Over the years, what counts as "basic, standard, premium" etc. changes. However, the goal of these different interior types remains the same.
- Basic Interior - Cheap materials, minimal sound deadening. Useful for cheap fleet vehicles, base model cars, and hardcore track cars.
- Standard Interior - Run-of-the-mill car interior with no special features, but adequate comfort and safety.
- Premium Interior - Higher quality standard interior, with more careful production and superior materials.
- Sport Interior - Interior construction changed in order to maximize weight savings. Lightweight, more expensive materials whenever possible.
- Luxury - Highest quality mass-production interiors, a refined version of the premium interior with the best available materials. Limited production.
- Hand Made - Pinnacle of luxury. Primarily used in ultra-luxury vehicles of the highest standards. No mass production.
Entertainment
Like the interior, the entertainment systems available change over the years. In the 1950's, an AM radio is considered a luxury, while in the 2000's such an option isn't even considered. Various entertainment systems are available throughout the years of the game, but not all together at the same time. These systems include a phonograph, AM radio, 8-track system, cassette system, CD system, satellite navigation (SatNav), infotainment, and heads-up display (HUD). Multiple standards of these systems exist, ranging from a basic to a luxury version.
- None - Literally no entertainment. Only useful for the most barebones of cars.
- Basic Entertainment - Few low-quality speakers, outdated or average systems.
- Standard Entertainment - More speakers improved quality, average systems.
- Premium Entertainment - Improved speakers and more advanced systems.
- Luxury Entertainment - Top-of-the-line sound system and other cutting-edge features.
Safety and Driving Aids

The car's drivability and safety is very important to the driver of the car. This tab contains systems that make driving easier, potentially prevent accidents, and protect the passengers in case there are accidents. Over the years (and depending on the market), safety standards increase, and a car with too low of a safety rating can easily be totally disqualified from a market.
Power Steering
Power steering is a system which assists the driver in controlling the steering wheels, which may be difficult to control, especially in a heavy vehicle. Hydraulic power steering works by feeding high pressure hydraulic fluids in a steering booster, which helps the driver steer the wheels. This comes at the cost of complexity, cost, and, most notably, power and efficiency loss, as the engine has to be tasked with running the power steering system. To mitigate the power and efficiency losses of a hydraulic power steering system, electric power steering can be used. These systems use electric motors to boost steering, which don't depend on the engine to run.
Both hydraulic and electric power steering systems have a variable option. Variable power steering adjusts how much power steering boosting is given to the car depending on speed. At low speeds, steering is fully boosted, to allow the driver to easily overcome friction against the road surface, and steer the wheels. At high speeds, steering is minimally boosted, in order to making smooth and precise control easier, for moves such as lane changes while on the highway.
Traction Aids
Traction aids exist to help the driver prevent accidents by maintaining better control over the car. These traction aids are not always available, and unlock gradually over the years.
- ABS - Anti-lock braking systems (ABS) prevent the wheels from locking up during hard braking. In a car that lacks ABS, the wheels may lock up during hard braking, causing the car to completely lose steering ability. This, of course, is undesirable. ABS prevents wheel locking by having the computer pump the brakes rhythmically during hard braking. This maximizes braking potential, while minimizing wheel lock, allowing for controlability during hard braking.
- TC - Traction control (TC) is a system in which the computer modulates the throttle to prevent wheel spin. When the wheels start spinning due to lost grip, the computer will kick in and cut power to restore traction. This system heavily cuts down on wheel spin.
- ESC - Electronic Stability Control (ESC) is a system which uses the brakes to counter oversteer and understeer. The computer uses one of the four brakes of the car to prevent loss of control in a turn, usually the outer front wheel to counter oversteer, or the inner rear wheel to counter understeer. ESC does not improve handling.
- LC - Launch Control (LC) is a system which maximizes acceleration and grip when launching the car (accelerating from a standstill). It works by holding the engine at a certain RPM, preparing the drivetrain for a launch. Launch control is usually found in modern sports cars and supercars.
Safety
Safety systems help protect the passenger. Over the years, safety standards and technologies develop and advance. These technologies include safer body contruction, such as shatterproof safety glass and crumple zones, and interior features such as airbags and seat belts. Of course, more advanced safety comes at the cost of increased engineering and production costs.
Suspension

Suspension tuning of the car is both the most difficult and most important aspect of car design. Suspension tune affects every aspect of the car, and can easily make or break a design. The goal of a perfect suspension system is to maximize grip by keeping the wheels planted on the surface, and maximize comfort by keep the car's body as level as possible while traveling over bumpy terrain.
Springs
Springs are the main component of a suspension system. The springs are responsible for cushioning the car as it rests on top of the wheels. Various types of springs exist which accomplish this task in different manners.
- Standard - Standard springs are simple coil springs. They are the cheapest and simplest to manufacture, are good for carrying loads, and offer consistent road feel. They are best suited for utility and inexpensive sports cars. Standard spings have a constant feel, as they exhibit the same spring rate throughout (the spring rate is a measure of how stiff the spring is). This postivally impacts sportiness, but negatively impacts comfort.
- Progressive - Progressive springs are similar to standard springs. The difference between them and standard springs is their variable spring rate. At the ends of the spring, the spring has a softer spring rate, which maximizes comfort, and and the center of the spring, the spring has a harder spring rate, to prevent bottoming out (or vice versa). These springs are slightly more complex and expensive compared to standard springs, but result in massive comfort improvements. Progressive springs are unsuitable for utility vehicles due to a reduced load-bearing capability, and unsuitable for sports cars due to their inconsistent road feel (as a result of the variable spring rate).
- Hydropneumatic - Solid mechanical springs are replaced with fluid-filled chambers. These provide excellent comfort at the cost of complexity and reliability. Hydropneumatic springs were pioneered by French automobile company Citroën in the late 1950s. The Citroën DS's hydropneumatic suspension famously helped save French President Charles De Gaulle's lifeduring an assassination attempt in 1962.
- Air - Similar to hydropneumatic suspension, except the hydraulic fluid is replaced with pressurized air. These suspension types are commonly known as air ride, and are used on heavy duty vehicles such as semi trucks. They surpass hydropneumatic suspension in reliability, and surpass progressive springs in sportiness, while maintaining similar comfort.
- Active - Active springs are controlled by a computer system, which regulates the springs in order to properly react to surface conditions, and maximize comfort or sportiness (depending on which configuration is used). Active springs can be set by the driver to behave in a soft, comfortable drive mode, or a hard, sporty drive mode.
Dampers
Dampers are responsible for controlling the springs. After the car rolls over a bump, the damper's job is to reduce bouncing of the car, and stabilize it back to its resting position. The easiest way to think of dampers is to think of them like brakes made for the springs, dissipating the spring's kinetic energy through internal friction.
- Twin-Tube - two hydraulic fluid-filled pistons are used to control the spring's bouncing. The hydraulic fluid within the pistons forces them to stop, which in turn, forces the spring to stop bouncing.
- Gas Mono-tube - works similarly to twin-tube dampers, except the hydraulic fluid is replaced with pressurized air. Improves sportiness through more consistent behavior.
- Adaptive - Adaptive dampening works by offering multiple damping coefficients as opposed to one. This is done by the driver, who can select preset driving modes such as "sport" or "comfort" to make the dampers harder or softer respectively. This system works with hydraulic dampers, and is limited by slow changing times and a limited number of damping coefficients.
- Semi-Active - an advancement of the adaptive damping system, this system reacts in real time to surface and conditions, and actively modifies its damping coefficient to best suit the needs to of the driver. This system can work to provide the best comfort or best sportiness at all times, or the best overall driving condition (an average between comfort and sportiness).
Sway Bars
Sway bars are metal bars which connect the wheels transversely (from side to side). These metal bars transfer kinetic motion in order to limit the body from swaying side-to-side, especially during hard cornering. The larger and thicker the sway bar is, the more it is effective at reducing sway, at the cost of more weight. Looser sway bars are generally better for comfort, but too much body roll can reduce comfort.
- Passive - Passive sway bars are simple metal rods which transfer kinetic motion transversely
- Semi-Active - Semi active sway bars work similarly to passive sway bars, with the main exception being the fact that semi-active swaybars can change between certain preset stiffnesses. The driver can activate "sport mode", which uses the stiffest sway bar setting to limit body roll, or "normal mode", which allows for more body roll for enhanced comfort.
- Offroad - Offroad sway bars act similarly to passive sway bars when coupled, but the coupling can be disabled in order to maximize terrain traversing potential. Having no sway bars is beneficial in an offroad situation, as it allows the car's body to actively react to the terrain differences.
- Active - Active sway bars are a development of the semi-active sway bar. Unlike the semi-active system, the active system can variably stiffen and loosen itself in accordance to surface conditions and cornering. This allows the system to maximize sportiness and comfort at all times.
Presets
Suspension presets offer you a base tune for you car's suspension, that will fit one of six purposes. You can choose to keep a suspension preset for your final design, or you can further tune the preset to your liking. The Comfort preset softens the suspension as much as possible, to enhance comfort. The Normal preset maintains a balance of comfort, sportiness and load bearing. The Sport preset hardens the suspension, increases negative camber, and lowers the ride height for maximum handling. The Utility preset raises the ride height, and hardens the suspension, especially the rear, in order to maximize load bearing. The Offroad preset raises ride height and softens the suspension, for maximum terrain crossing capability. The Race preset works similarly to the Sport preset, but with no consideration for comfort, load bearing, or tire wear.
Suspension Tuning
The suspension tuning tab is the core of suspension design. This is where you fine tune your suspension's behavior. With control over the suspension's cambering, stiffness, dampening and sway bars, you are able to configure many of the vehicle's core attributes, such as handling, comfort and load bearing.
- Camber - Camber refers to the vertical angle of the car's wheels. Camber is measured in degrees offset from a straight vertical line. Positive camber is when the bottom of the wheels tuck inwards, and the top sticks outwards. Positive camber increases tire wear and reduces grip, and is only seen in vehicles where load capacity is important. Negative camber is the opposite of positive camber. Negative camber is when the top of the wheels tuck inwards, and the bottom sticks outwards. Negative cambering improves cornering grip, at the cost of increased tire wear. A common range of camber setting in factory suspension tunes ranges from 0.0 degrees to -2.0 degrees. More negative camber is often used for sportier cars.
- Springs - The spring values refer to the spring stiffness. Spring stifness is determined based on how heavy your car is, and what purpose you wish to accomplish with it. The springs must be stiff enough to prevent the car from bottoming out, while being soft enough to be comfortable to ride in. Stiffer springs increase load bearing and reduce bottoming out, at the cost of reduced grip and comfort. Stiff springs have reduced grip due to their reduced ability to react and conform to the road surface, compared to looser springs. However, despite all this, stiffer springs are still preferred for sportier cars in order to allow for lower ride heights by preventing bottoming out. Stiff rear springs are specifically employed by utility vehicles in order to maximize carrying capacity.
- Dampers - The damper values refer to the dampening coefficients. Higher dampening coefficients means stiffer dampers. In turn, stiffer dampers means the suspension's springs return to a rest state quicker. Dampers that are too stiff result in lost comfort. Stiffened dampers are preferred for sports cars, as being able to return the springs to a rest state allows the full weight of the car to press on the wheels and maximize grip.
- Sway Bars - The sway bar values refer to the strength of the sway bars. Stronger sway bars reduce side-to-side rolling of the car's body, at a cost of more weight. A moderate amount of sway (5% to 7.5%) is preferred for comfort, while reduced sway is preferred for sports cars, to improve handling grip and stability. Zero sway bars can be used for offroad vehicles, however offroad vehicles prefer having offroad sway bars rather than nothing.
Ride Height
The ride height of an Automation car is a measurement of the vertical distance from the rocker panel (the bottom of the side skirts) to the surface/bottom of the tires. Ride height can be affected by tire diameter and spring height (which is what the slider controls). A higher ride height is favored in utility and offroad vehicles, as it offers superior load capacity and ground clearance. A lower ride height is favored in sports cars due to reduced drag and centre of gravity. Depending on your suspension geometry, you may have limits to what ride heights you can select. For example, pushrod suspension only allows for low ride heights, while a front solid axle only allows for a tall ride height.
Suspension Graph

Once you have setup your suspension, the car is considered completed. Of course, you can go back and modify anything you'd like. When the the car is complete, the suspension graphs will display themselves. On the suspension graphs, you will see a steering graph, suspension graph, and suspension details. For more information on the steering graph, click here. The suspension testing graph will show your front (red) and rear (blue) spring behavior. The graph represents how your suspension reacts to a bump, up to 3.5 seconds after hitting the bump. The vertical axis represents how much the spring compresses (position < 0) and decompress (position > 0). The chart below the graph displays spring oscillation frequency (in Hertz), which means how much the spring bounces. The chart shows a range of frequencies that are optimized for comfort, drivability and sportiness, and how optimized your suspension setup is for each stat. Below the spring frequencies, you can see the dampening coefficients of your dampers. To the right of the suspension graph, you can see bottoming out (in percentage), body roll (in degrees), load capacity (in Kg), and additional maintenance cost due to tire wear. For more information on suspension tuning, watch this video.
Vehicle Statistics
The vehicle statistics pages displays various information about your car's design, including a break down of statistics, performance in the car markets of the five fictional nations, detailed statistics, and the vehicle's performance in the test track.
Design Mode

Once you have completed your design, you will see the vehicles statistics page. In the Design mode (the default page), you are able to see your car's top speed, 0-100 kmh time, 100-0 kmh time, quarter mile time, kilometer time, cornering G-forces, acceleration G-forces, roll angle, 100-0 braking distance, brake fade (drivability, sportiness and utility), cabin and cargo volume, front and rear downforce, curb weight, weight distribution, load and towing capacities.
Market Mode

In the market mode, you are able to see how your car stacks up in the markets of 5 different fictional nations:
- Gasmea (a representation of USA, Canada and Australia)
- Hetvesia (a representation of Switzerland, Germany and the Nordic Nations)
- Fruinia (a representation of Southern Europe and Japan)
- Dalluha (a representation of Saudi Arabia, Qatar and the UAE)
- Archana (a representation of a Communist or third-world state)
The market mode also displays various statistics of the car. These stats are drivability, sportiness, comfort, prestige, safety, practicality, utility, off-road, reliability, environmental resistance, footprint, cargo volume, passenger volume, maintenance costs (yearly), fuel economy, emissions, fuel octane requirement, material costs, production time (in months), engineering time (in months), and estimated sales price. Although the monetary value is somewhat arbitrary, the value of in-game money may resemble 2015 NZD (New Zealand dollars) or 2012 USD (United States dollars).
Detailed Stats

In the Detail Stats mode, you are able to review why your design got a certain drivability, sportiness, comfort, prestige or safety rating. This screen will review how all of your engineering choices affected each measurement that goes into the aformentioned statistic, and displays how the calculations work. This also works for minor statistics such as practicality, utility, offroad performance, and fuel economy. This screen also shows how the base values of each characteristic has been tested and evaluated. For example, the drivability statistic has been calculated using an evasion test (where an obstacle suddenly appears on the road in front of the car, such as in the infamous moose test), a footprint measurement (meaning how much space your car takes up - a smaller car is usually easier to control, and thus more drivable), and a controllability test (how well your car can speed up, slow down, or change direction of travel).
Test Track
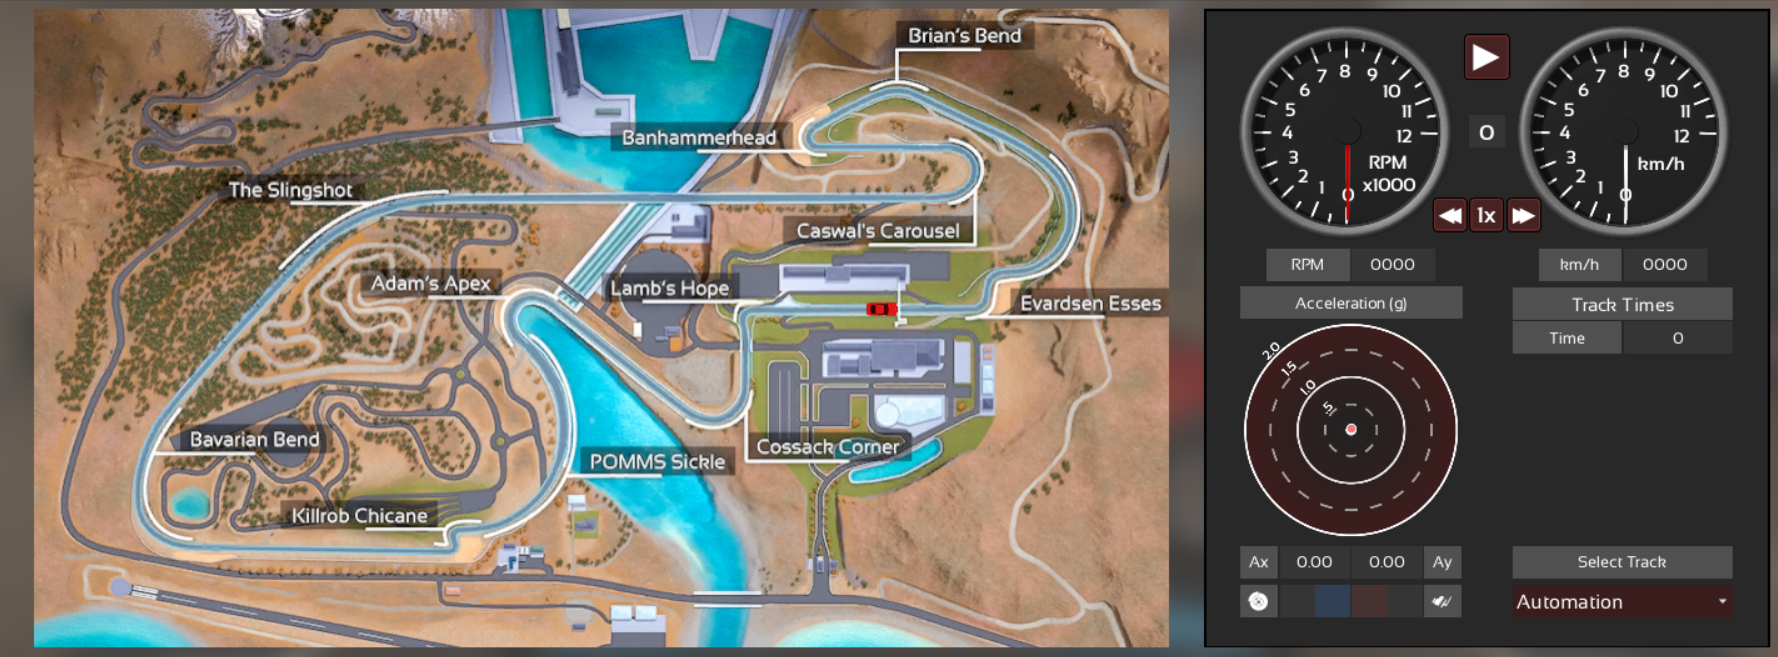
The test track mode displays your vehicles performance around two test tracks - the Automation test track, which you can personally drive in through BeamNG.drive, and the Top Gear test track. The Automation test track is meant to test your car's performance to the very limit, through multiple corners, hairpins, high speed curves, and long straightaways. On the right of the screen, you can see what the AI controlling your car is doing. You see the engine's RPM, the speed at which your car is travelling, and G-forces your car is experiencing. You can also see how much throttle or braking the AI driver is doing. At the end of the lap, you can see the final track times, and attempt to match or even beat them in BeamNG.drive.
Summary

With a completed design, you can now review your car's statistics on the summary page. All pages contain the Trim Statistics section, which displays drivability, sportiness, comfort, prestige, safety, practicality, utility, offroad, fuel economy, weight, reliability, material costs, production time, and engineering time.
In the centre of the screen, you can see engineering warnings, that show the flaws or unwanted characteristics of your car's performance, and a suggestion on how to fix the issue. Certain issues are more severe than others, as a result they come in three grades - issues that need to be noted, considered, or immediately fixed. These are all issues that may negatively impact certain car statistics. For example, the oversteer warning of the example car negatively impacts drivability and sportiness, as an oversteering car is harder to control, and prevents the car from being driven closer to its performance limits. The game suggests increasing rear grip to mitigate the issue, which can be done through many means previously mentioned. There is also a note regarding slight brake fade, with the suggestion of increasing brake size to reduce fade. Engineering warnings can be viewed from any tab in the trim designer, by hovering the cursor over the warning square on the bottom right of the UI. The warning square may appear grey (no warnings), blue (notes), yellow (considerations), or flashing red (fix needed) depending on the severity of the warnings.
On the right of the screen, there is a breakdown of each individual parts' material cost, as well as engineering and production times, with the total displayed on the bottom. Note that engineering and production times are not calculated via simple addition, rather via complex calculations. In the final page of the car designer, you are able to review your car's details and your engine's details. The car details include the car name (a placeholder name was used for the example car, but you can freely choose any name you'd like), the car type and seating, the car's dimensions, construction, drivetrain, transmission, suspension geometry and weight. The engine's details include the engine name (in this case, a custom name was used), the engine's power output, redline, block type, head type, compression ratio, fuel system, thermal efficiency and power to weight ratio.
With your car now complete, you can choose to export your car to BeamNG.drive by pressing the BeamNG logo button, and then drive your car in BeamNG.drive, or you can export a .car file of your car, in order to share your design with other people. Your .car files can be found in:
C:\Users\your username\Documents\My Games\Automation\CarSaveExport
With your car design now complete, feel free to make more variants of your design, or an entirely new design. You can always experiment with what works for the Automation markets, or what works for the BeamNG test track, and keep building various cars to further practice your engineering or designing skills. Have fun!