Introduction
The trim designer is where you are able to finalize your car by designing and configuring the car's exterior, interior, drivetrain and various other aspects. The trim designer is accessible only once you have created a car model, and have selected or designed an engine for your car. Each trim represents a variation of your model upon which the trim(s) are base off of. Each trims within a model will share common features such as chassis type and suspension geometry, however, they can exist in different body styles, have different drivetrains and engines, and have various interior configurations/options. Diverse sets of trims within a model allows your car model to fulfill multiple roles, such as a car model with a family-oriented sedate wagon trim, and sporty luxurious sedan trim, all within the same car model.
Body Style Selection

The first page that you will see once you set up your car model and engine is the trim body selection. When choosing a model, you are given a group of related body styles, and in the trim body selection, you choose which specfic body style you want for the trim you are building. The body style variety depends on which model you have selected. Some models, such as supercar models, may only have one available body, meanwhile standard passenger cars (such as the one pictured above) may be available in sedan, hatchback, wagon or coupe variants. Once you select a body, there are certain regions of the bodies that can be pushed in or pulled out in order to modify the look of the body. These regions are known as morphs, and allow for more unique designs. Morphs are not just aesthetic, they are able to affect car stats such as drag, lift/downforce, weight, and interior volume.
Paint

Now that you have selected your desired body style, you are now able to manipulate the paint of the car. This is done through the paint selector. The paint selector contains two tabs: the scheme tab, which is work-in-progress, and the slots tab. From the slots tab, you are able to apply any paint color of your liking to up to 14 seperate paint slots, as well as painting all slots at the same time. Each different car bodies have a different amount of paint slots that affect different areas of the car, it isn't 100% consistent between car bodies. These slots include the car body slots, such as the bumpers (front and rear), the hood (bonnet), the primary section of the body, the secondary section of the body (not all cars have a secondary slot). There are also trim slots, such as window border trim, trim (which can be any component of the car's body), pillar (window pillar(s)), and mirrors (older car bodies used to have mirrors integrated into the body itself, now the mirror slot is used as an extra slot in most bodies). The wheel slots include the primary zone of the wheel, secondary zone, and rim of the wheels. The miscallaneous slots include a truck bed paint slot (for trucks and utes only), a convertible top paint slot (for soft top convertible bodies only), and a brake caliper slot.

Once you select a certain slot for painting, you can now select the paint you want. The types of paints you ca:n select include the 'on car' paints, 'global' paints, and 'default' paints.
Default paints: Includes the game's default materials, such as soft top vinyl, plastic, carbon fiber, red metallic paint (default paint), leather, aluminum, cloth, chrome and steel.
On car: Paints that are custom-made by the user, and that are or were used in one of the car's slots. Accessible only from the specific trim applied to.
Global: Paints that are custom-made by the user. Accessible from any trim.
By pressing the large paint bucket or ABC button, you can change the way your paints are organized (either by hue, or by alphabetical order of name). If you wish to create a new paint, simply press the large + next to the paint bucket/ABC button. When you do this, you will access the paint maker.

In the paint maker, you can select various parameters to create a new paint. The first of which is the material parameter, which controls the base material of the paint. These are the same materials present in the default paint group. Once you select your desired base material, you can now choose the color. There are 147 different hues available for your paint. After you select your color, you can configure the shine of the paint (meant to simulate clearcoat), and flake (meant to simulate metallic paints). In the preview slot, you can see the final result of your paint design, and edit its name. Hitting the check button confirms your choice, and X cancels the choices. If you feel like the simplified paint maker is too limiting in paint choices, selected the paint bucket button on the bottom right will lead you to the advanced paint maker.

In the advanced paint maker, you are able to fine tune your paint's characteristics. You can modify your paint's hue (color), saturation (how rich and colorful your paint is), and value (how bright your paint is). You are also able to fine tune your paint's shine and flakiness. In the simple paint designer, the shine settings of high, medium, low, are equivalent to 1.0, 0.5, 0.1 shine respectively, while the flake settings of high, medium, none are equivalent to 1.0, 0.5, 0.0 flake respectively. The advance paint designer also allows you to add pearlescent effects to your paint. Pearlescent color modifies how your paint shines and reflects. By default, the pearl color is white (meaning there is no pearlescent effects).
Fixtures

The central aspect of your car's aesthetic design revolves around the use of fixtures. Fixtures are various 3D models of items such as headlights, grills, license plates etc. that you can paste on your car's body in order to really make it look like a proper car rather than a blank body shell. There are 1,918 fixtures in game, and many more available through the Steam Workshop as mods. All mod objects have a banner on the corner of their thumbnail which says "mod".
Fixture Categories
Fixtures are organized by their types, as there are many different fixtures in game (as evidenced by the high fixture count). There are six categories of fixtures - lighting, cooling, aerodynamics, miscellaneous 1, 2 and 3. In the lighting category, you can find headlights, taillights and indicators/side markers. In the cooling category, you can find fixtures such as grills, vents, scoops, and sunroofs/windows. In the aerodynamics category, you can find lips and diffusers, spoilers, and wings. In miscellaneous 1, you can find gas caps, door handles and mirrors. In miscellaneous 2, you can find antennas, license plates, bumper bars, and badging. In miscellaneous 3, you can find wheel designs, exhaust tips, miscellaneous fixtures, and a tow hitch. Most fixtures are purely aesthetic, however aero fixtures will affect drag, lift and downforce characteristics, and the tow hook fixture is functional in BeamNG.drive. The exhaust tips also act as a smoke source for exhaust fumes and backfire in BeamNG.drive, however those are simply aesthetic effects.
Fixture Manipulation

Fixtures can be modified in many ways. To begin, many fixtures in game exist as a group of various fixtures, such as this rectangular sealed beam headlight, which exists in 10 different variations. There are various ways to edit the fixtures themselves, change how they interact with the car body, and change how they interact with each other. To go over the fixture editor, we will start with the upper left corner, at the 1/4 button. This is the fixture layering area, which allows fixtures to sit directly on top of other fixtures, hiding the lower layered fixture below. Two fixtures sitting in the same area on the same layer will have flickering known as Z-fighting, this is mitigated by having on fixtured layered on top of the other. Fixture layering may be useful for blending multiple fixtures into one design element, or hiding away an undesirable part of another fixture.Next to the layering options, there are tow bottons for resetting the fixture's scaling and rotation back to their default values. Next to that, there is a the rotation selection. You can choose to type in your own rotation angle (in degrees ranging from -360 to 360) to be able to fine tune your fixture placement. The two buttons next to the rotation angle are buttons made to rotate the selected fixture by 90 degrees, counter-clockwise or clockwise. The next two buttons flip your fixture, in the vertical or horizontal axis respectively. The button next to the flipping buttons toggles fixture mirroring on or off.

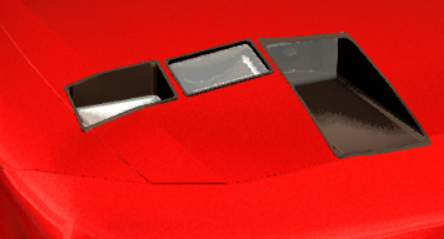
Three identical fixtures, interacted with the body in three different manners. Left to right: cardinal lock, align to body, align to horizon
The next three buttons modify how the fixture interacts with the car body. These buttons are (from left to right), 'align to body', 'cardinal-lock', and 'align to horizon'. The align to body function causes the fixture to align itself based off the car's geometry, allowing the fixture to follow the shape and contouring of the body. The second function, cardinal lock, forces the fixture to face one of six cardinal directions: up, down, left, right, forward, backwards. The third function, align to horizon, works similarly to cardinal lock, except the up and down directions are disabled, meaning the fixture can only face forward, backwards, left or right. Due to a bug, 'align to horizon' setting can only be enabled if the fixture was set to 'align to body' first.
ㅤ
ㅤ
ㅤ
ㅤ
ㅤ
After the direction modifying functions, the rest are utility functions. The first, represent by a trash can icon, is for deleting the selected fixture. The next two are undo and redo buttons. The padlock represents a locking feature, which locks the selected fixture so that it cannot be moved, rotated or scaled. The final checkmark button unselects the fixture, applying the modification(s). On the top right of the fixture selection area, there is a circle and a magnet button. The circle button toggles fixture highlights, which means that selected fixtures have a lime-green outline, and fixtures being hovered over have a yellow outline. By default, this feature is on. The magnet button represents center-lock, which means fixtures automatically snap to the center of the car body when the feature is toggled on (by default it is on).

The final aspect of fixture manipulation is the material editing area. Most fixtures in game (with the exception of badges) have an area or multiple areas that can have their materials edited. Different types of areas can accept different types of textures. There are five groups of materials, and each material editing slot can access only one of the five material groups (the creator of the fixture decides which material group each material editing slot accesses). For example, plate slots can only accept plate materials, and glass slots can only accept glass materials. Material selection is quite an important feature, as it allows any fixture to be used for anything. One of the most important hints regarding car design within the game is to learn how to use fixtures for purpose they were not made for. On the left, are all available materials, arranged by their groups.
There isn't much that can be said about creating a good looking design, as looks are subjective and unable to measured objectively. The best designing advice is to look at real cars from the same time period as your creation, and use similar fixtures and design cues (for example, using circular seal beam headlights and lots of chrome accents on a 1960's American car build). The second best advice for creating good visual designs is to visit the forum and the Automation Discord server, where other game players will be able to guide and critique your design(s).